# User interface
# Payment page
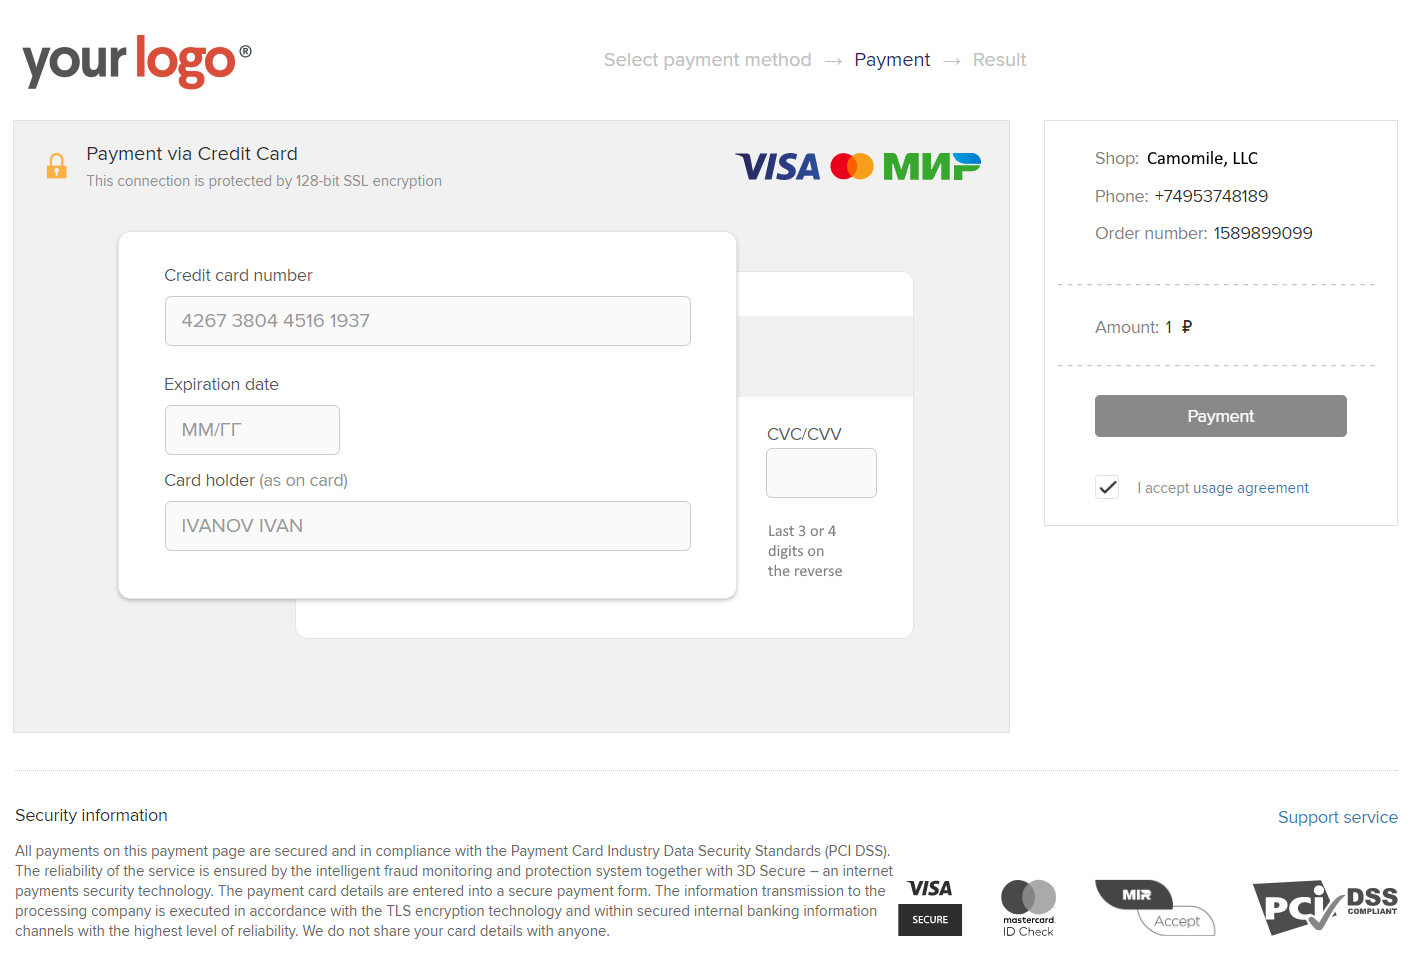
The Mandarin payment page is responsive and includes your logo as well as the payment information you provide in your API request.
To work with the payment page, you need to redirect the user to the address from the userWebLink parameter, which is received in the synchronous response to your API request.
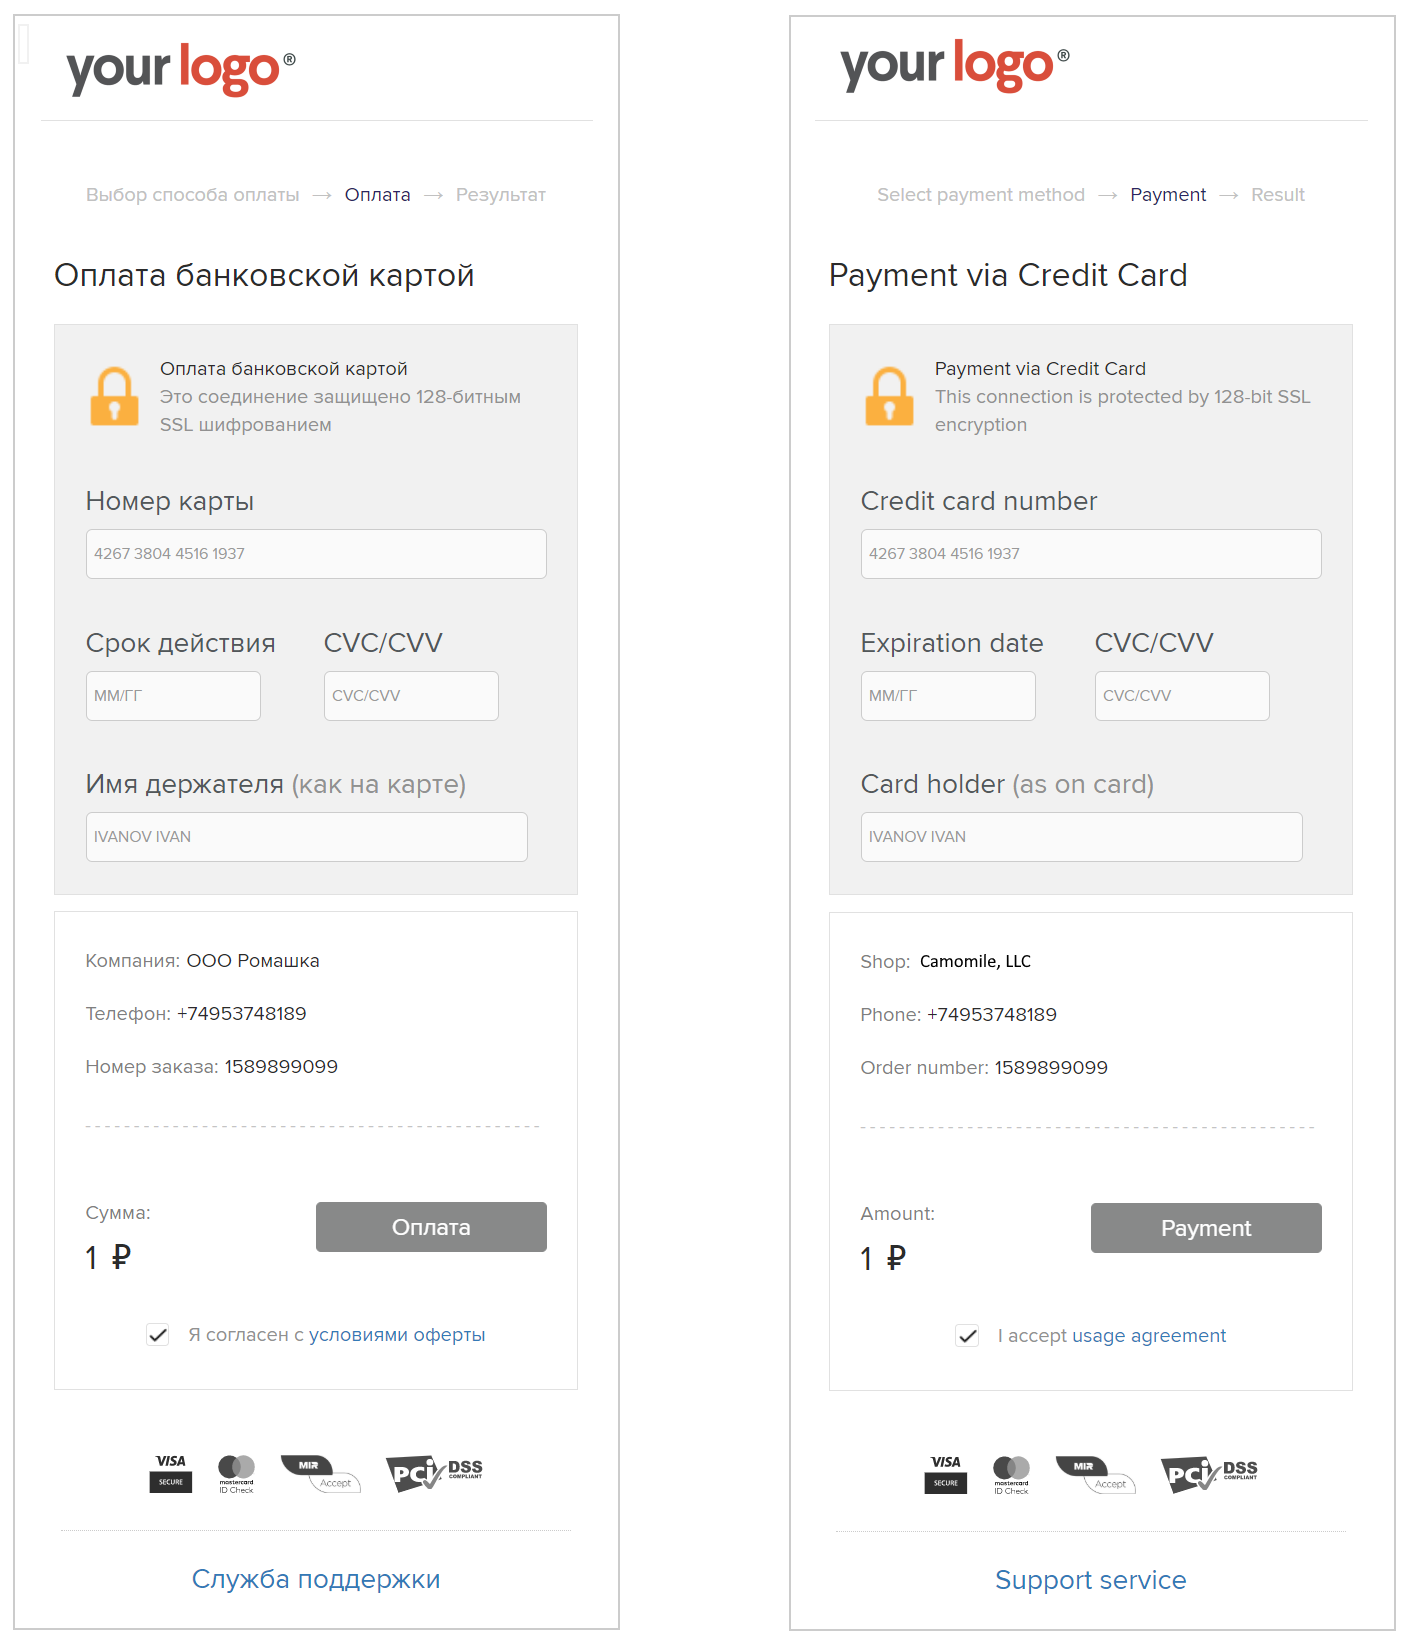
The payment page is localized in Russian and English. The language is selected automatically depending on the user's browser settings.
Payment page in Russian

Payment page in English
Mobile layout of the payment page
# Custom Form
# Built-in form for processing card data
The built-in form of processing card data allows for full integration into your interface, and there are no requirements for compliance with the PCI DSS bank card security standard.
When creating your payment page and integrating the form into it, you should remember that if you transfer commissions to the payer, in the Custom Form interface you must indicate “Payment service commission” or “Commission for payment by card,” depending on who takes the commission (Mandarin or your service) since Custom Form is a White label solution. For example, “Amount to be paid: 3060.0 rub. (including payment service commission 60.0 rub.).”
A Custom Form is a form with fields that are actually separate pages in an iframe. Accordingly, you can style everything surrounding the iframe fields.
Such a form consists of two parts: html code, which is a layout of future fields, consisting of div elements with classes indicating in which of the elements the corresponding iframe field will be placed, surrounded by a form element with a unique identifier ( arbitrary). A button, link, or other element is also added to the form, serving as a form submission trigger.
To start drawing the form, you need to create a transaction according to the instructions - payment, payment
# Basic principles of form
In its simplest form, the form looks like this:
Filling out mandarinpay-fields for the form:
| Parameter | Operation type | Required |
|---|---|---|
| card-number | Pay, Payout | Yes |
| card-holder | Pay | Optional |
| card-expiration | Pay | Yes |
| card-cvv | Pay | Yes (payment without cvv is possible, please contact technical support for clarification) |
Form code
<form id="form-hosted-pay">
     <div class="mandarinpay-field-card-number"></div>
     <div class="mandarinpay-field-card-holder"></div>
     <div class="mandarinpay-field-card-expiration"></div>
     <div class="mandarinpay-field-card-cvv"></div>
     <button onclick="return mandarinpay.hosted.process(this);">Pay</a>
</form>
The classes mandarinpay-field-card-number, mandarinpay-field-card-holder, mandarinpay-field-card-expiration and mandarinpay-field-card-cvv will be populated with the corresponding iframe fields.
This form is processed by the hosted fields script, which connects to the HTML: <script src="https://secure.mandarinpay.com/api/hosted/v2.js"></script>
After connecting the hosted fields script, you need to pass it the ID of the html form and the operationId received in the jsOperationId field of the synchronous response.
This is done with the mandarinpay.hosted.setup function:
<script>
mandarinpay.hosted.setup("#form-hosted-pay",
{
   operationId: "9874694yr87y73e7ey39ed80",
});
</script>
At this moment, the form is initialized, the corresponding iframe fields are placed in the div elements of the form, and the form can be filled out. The completed form data is transferred to the hosted fields script with the command mandarinpay.hosted.process(this);, as shown in the example html code of the form, or with the command mandarinpay.hosted.process('#form-hosted-pay'); . These commands in this case are equivalent.
Although the form works in this form, for real use it is necessary - and exists - much more extensive functionality that allows you to customize the appearance, behavior and additional features.unique possibilities of form. This functionality will be discussed in subsequent sections.
# Layout and appearance of the form
For user convenience, an embedded form requires a much larger number of elements - for example, you need to somehow label the form fields, highlight the states of the form fields, be able to change the form font, add placeholders, and so on. As an example of more complex html code, we use the following:
Example of a more practical payment form code
<form id="form-hosted-pay">
   <div style="margin: 10px; padding: 10px; border: 1px solid gray">
     Card Number:
     <div class="mandarinpay-field-card-number hosted-field"><div class="glyphicon glyphicon-check"></div></div>
     Card Holder:
     <div class="mandarinpay-field-card-holder hosted-field"><div class="glyphicon glyphicon-check"></div></div>
     Card Expiration:
     <div class="mandarinpay-field-card-expiration hosted-field"><div class="glyphicon glyphicon-check"></div></div>
     CVV:
     <div class="mandarinpay-field-card-cvv hosted-field"><div class="glyphicon glyphicon-check"></div></div>
     <br/>
     <a href="#" onclick="return mandarinpay.hosted.process(this);" class="btn btn-default">Pay</a>
   </div>
</form>
Example of a more practical payout form code
<form id="form-hosted-pay">
   <div style="margin: 10px; padding: 10px; border: 1px solid gray">
     Card Number:
     <div class="mandarinpay-field-card-number hosted-field"><div class="glyphicon glyphicon-check"></div></div>
     <br/>
     <a href="#" onclick="return mandarinpay.hosted.process(this);" class="btn btn-default">Pay</a>
   </div>
</form>
As you can see, additional classes, inline styles have been added, additional elements <div class="glyphicon glyphicon-check"></div> have been added to the form fields, allowing you to use Bootstrap glyphicons (for this, of course, you need to connect the corresponding Bootstrap component ), replaced the "Pay" button with a link (Bootstrap is also used to display it).
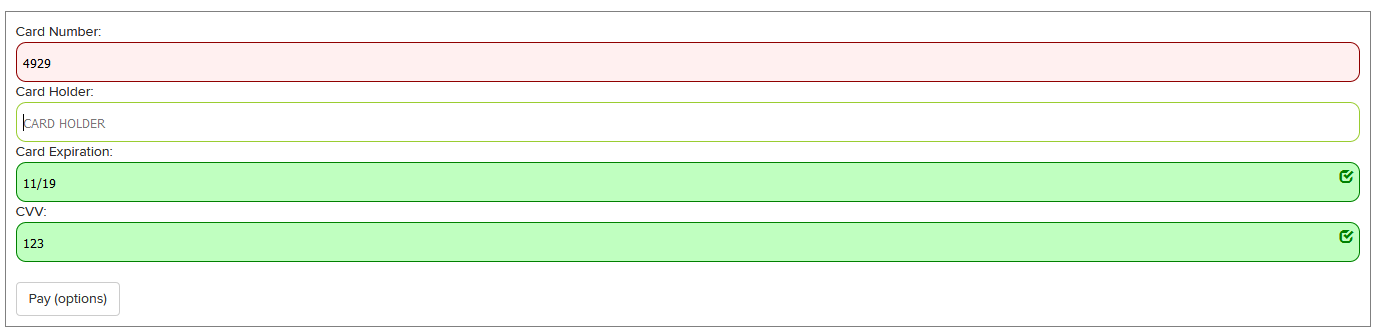
It should be remembered that during user interaction with the form, div tags can be assigned the classes mandarinpay-field-state-error, mandarinpay-field-state-focused and mandarinpay-field-state-valid, indicating accordingly, the state of each field and the values entered into it (the hosted fields script also validates the values as they are entered).
Accordingly, now we need to add styles that allow us to display the form more clearly and allow the user to intuitively understand what exactly is happening with the form at the moment.
CSS for fields
.hosted-field
{
     background: #f0f0f0;
     height: 40px;
     padding: 5px;
     border: 1px solid gray;
     border-radius: 10px;
}

.hosted-field {
     position: relative;
}

.hosted-field .glyphicon {
     visibility: hidden;
     position: absolute;
     right: 5px;
     top: 5px;
     color: green;
     float: right;
}

.mandarinpay-field-state-error
{
     background: #fff0f0;
     border: 1px solid #900000;
}

.mandarinpay-field-state-focused
{
     background: #ffffff;
     border: 1px solid yellowgreen;
}

.mandarinpay-field-state-valid {
     background: #c0ffc0 !important;
     border: 1px solid green !important;
}

.mandarinpay-field-state-valid .glyphicon{
     visibility: visible;
}
But this way you can only customize those elements that exist on the page; everything displayed directly in the iframe is not available for styles. Styling the content of the iframe is done by adding the appropriate field to the object passed to mandarinpay.hosted.setup. Placeholder and CSS styles are available for modification.
Example of styling for payment
mandarinpay.hosted.setup("#form-hosted-pay",
{
   operationId: "9874694yr87y73e7ey39ed80",
   fields:
   {
     "card-number": {
       settings: {
         placeholder: "CARD NUMBER",
         styles: {
           "font-size": "20px",
           "font-family": "Helvetica",
           "color": "#0000c0"
         },
         placeholderStyles: {
           "color": "pink"
         },
       }
     },
     "card-cvv": {
       settings: {
         placeholder: "123",
         styles: {
           "font-size": "20px",
           "font-family": "Helvetica",
           "color": "#555"
         },
       }
     },
   }
});
Payout styling example
mandarinpay.hosted.setup("#form-hosted-pay",
{
   operationId: "9874694yr87y73e7ey39ed80",
   fields:
   {
     "card-number": {
       settings: {
         placeholder: "CARD NUMBER",
         styles: {
           "font-size": "20px",
           "font-family": "Helvetica",
           "color": "#0000c0"
         },
         placeholderStyles: {
           "color": "pink"
         },
       }
     }
   }
});
colorin the format#000000.font-sizewith unitspxandpt.font-family(commas and quotes can be used).font-style.
As a result, we get a similar basic version of the appearance:
# Form events and their handling
To improve user interaction with the site and with the payment form, it is necessary to receive and process events that occur while the user is working with the form. To achieve this, several event handler hooks were implemented; a code example with explanations is given below.
Implementation of payment hooks
mandarinpay.hosted.setup("#form-hosted-pay",
{
   operationId: "9874694yr87y73e7ey39ed80",
   onsuccess: function(data) {
     // Event triggered upon successful payment.
     // The returned data contains information for further processing or display to the user.
     alert("Success, id: " + data.transaction.id + ' card number: ' + data.cardInfo.maskedCardNumber);
   },
   onerror: function(data) {
     // Event triggered upon failure - for example, there is no money on the card, incorrect card number, and so on.
     alert("Error code: " + data.errorCode +" text: " + data.error);
   },
   cancel: function(data) {
     // Event triggered when the user refuses to pay - for example, closing the 3-D Secure window instead of entering a code.
     console.log(data);
   },
   onvalidationerror: function() {
     // The event is triggered when an attempt is made to send invalid data when the payment button is clicked.
     alert("Validation error");
   },
   onformstatechange: function(state) {
     // An event that fires every time the state of the form changes - for example, user input, loss of focus, and so on. If, for example, you need to activate the payment button only if all the data entered by the user in all fields is valid, it is convenient to use this event for verification.
     console.log(state);
   },

   fields:
   {
     "card-number": {
       settings: {
         placeholder: "CARD NUMBER",
         styles: {
           "font-size": "20px",
           "font-family": "Helvetica",
           "color": "#0000c0"
         },
         placeholderStyles: {
           "color": "pink"
         },
       }
     },
     "card-cvv": {
       settings: {
         placeholder: "123",
         styles: {
           "font-size": "20px",
           "font-family": "Helvetica",
           "color": "#555"
         },
       }
     },
   }
});
Implementation of payout hooks
mandarinpay.hosted.setup("#form-hosted-pay",
{
   operationId: "9874694yr87y73e7ey39ed80",
   onsuccess: function(data) {
     // Event triggered upon successful payment.
     // The returned data contains information for further processing or display to the user.
     alert("Success, id: " + data.transaction.id + ' card number: ' + data.cardInfo.maskedCardNumber);
   },
   onerror: function(data) {
     // Event triggered upon failure - for example, there is no money on the card, incorrect card number, and so on.
     alert("Error code: " + data.errorCode +" text: " + data.error);
   },
   cancel: function(data) {
     // Event triggered when the user refuses to pay - for example, closing the 3-D Secure window instead of entering a code.
     console.log(data);
   },
   onvalidationerror: function() {
     // The event is triggered when an attempt is made to send invalid data when the payment button is clicked.
     alert("Validation error");
   },
   onformstatechange: function(state) {
     // An event that fires every time the state of the form changes - for example, user input, loss of focus, and so on. If, for example, you need to activate the payment button only if all the data entered by the user in all fields is valid, it is convenient to use this event for verification.
     console.log(state);
   },

   fields:
   {
     "card-number": {
       settings: {
         placeholder: "CARD NUMBER",
         styles: {
           "font-size": "20px",
           "font-family": "Helvetica",
           "color": "#0000c0"
         },
         placeholderStyles: {
           "color": "pink"
         },
       }
     }
   }
});
# Adding Apple Pay functionality
For devices that support Apple Pay, it's useful to add payment via Apple Pay. This functionality is also available to our script, but requires a slightly more complex connection. The Apple Pay button should not be shown if the browser or device does not support this functionality, or if the merchant does not allow payment via Apple Pay; There is a special check for this, which is described below.
Let's start by initializing the form. For the previously discussed functionality, this was not important to us, but in general mandarinpay.hosted.setup is a promise that returns a session with additional functions. A discussion of promises is beyond the scope of this instruction, so this example assumes that promises are always fulfilled and only shows the processing of successfully returned data.
Initializing a script with access to additional functionality
// It is important to note that the scope of the hostedSession variable must be global - it is possible to access this variable from different places and even scripts.
var hostedSession;

mandarinpay.hosted.setup("#form-hosted-pay",
{
   operationId: "9874694yr87y73e7ey39ed80",
   onsuccess: function(data) {
   },
   onerror: function(data) {
   },
   cancel: function(data) {
   },
   onformstatechange: function(state) {
   },
   fields:
   {
     "card-number": {
       settings: {
         placeholder: "CARD NUMBER",
         styles: {
           "font-size": "20px",
           "font-family": "Helvetica",
           "color": "#0000c0"
         },
         placeholderStyles: {
           "color": "pink"
         },
       }
     },
     "card-cvv": {
       settings: {
         placeholder: "123",
         styles: {
           "font-size": "20px",
           "font-family": "Helvetica",
           "color": "#555"
         },
       }
     },
   }
}).then(function(result){
     // We get the result of the promise - the session - and save it in our global hostedSession variable - then it is possible to either access the session from other places through the hostedSession variable (for example, when clicking the Apple Pay button), or, for example, pass the session directly to a function.
     hostedSession = result;
     // Checking whether the device and merchant supports Apple Pay is possible, of course, only after receiving the session, so it is launched upon the return of the promise.
     setupPromiseReturned(result);
   });

function setupPromiseReturned(result){
   // launch the promise isApplePaySupportedAsync . When the promise returns a response, the response is passed to the processApplePayResolve function. The answer, in fact, can only be true or false.
   result.isApplePaySupportedAsync().then(processApplePayResolve);
}
function processApplePayResolve(result){
   // The script sent an answer asking whether it is possible to show the Apple Pay button in this case. The check includes both browser support and merchant settings. The answer can be true or false
   if (result){
     console.log('Apple Pay is supported. Show the button.');
     $('.apple-pay-button').show();
   }else{
     console.log('Apple Pay is not supported. We do not show the button.');
   }
}
We also add an Apple Pay button to the form. You can add it anywhere.
Form code with Apple Pay button
<form id="form-hosted-pay">
   <div style="margin: 10px; padding: 10px; border: 1px solid gray">
     Card Number:
     <div class="mandarinpay-field-card-number hosted-field"><div class="glyphicon glyphicon-check"></div></div>
     Card Holder:
     <div class="mandarinpay-field-card-holder hosted-field"><div class="glyphicon glyphicon-check"></div></div>
     Card Expiration:
     <div class="mandarinpay-field-card-expiration hosted-field"><div class="glyphicon glyphicon-check"></div></div>
     CVV:
     <div class="mandarinpay-field-card-cvv hosted-field"><div class="glyphicon glyphicon-check"></div></div>
     <br/>
     <a href="#" onclick="return mandarinpay.hosted.process(this);" class="btn btn-default">Pay</a>
     <div class="apple-pay-button apple-pay-button-black" style="display: none;" onclick="return hostedSession.popupApplePay('#form-hosted-pay');"></div>
   </div>
</form>
Please note that the button is hidden by default - after all, it is not known whether Apple Pay is supported or not until promises are processed, and therefore we cannot immediately show the button. If the response from the isApple PaySupportedAsync promise is positive, the button is shown to the user, and if it is negative, it simply remains hidden.
Apple offers its own instructions on shape, size, display rules and other working features (opens new window) with Apple Pay button; an example of one of the possible layout implementations is given below.
@supports (-webkit-appearance: -apple-pay-button) {
     .apple-pay-button {
         display: inline-block;
         -webkit-appearance: -apple-pay-button;
     }
     .apple-pay-button-black {
         -apple-pay-button-style: black;
     }
     .apple-pay-button-white {
         -apple-pay-button-style: white;
     }
     .apple-pay-button-white-with-line {
         -apple-pay-button-style: white-outline;
     }
}
Considering the capabilities provided by the hosted fields script, the possibilities of integrating a payment form into your interface are limited only by the imagination of your designer and the experience of the programmer. Some examples of hosted fields form integration can be seen on demo page (opens new window).
# Payment via SBP for Custom Form
Each request must be authenticated using a token (access_token) obtained in accordance with the OAuth 2.0 protocol for applications.
The token is valid for 36,000 seconds (10 hours). If the validity period has expired, the token must be requested again.
Contact Customer Support (opens new window) to find out your client_id and client_secret to get the 'access_token'.
Request for a token:
It includes mandatory form-data parameters that are passed in the request body (the application.client_id and application.client_secret parameters are unchanged for the application and stored on the client side).
| Parameter | Description | Example |
|---|---|---|
| grant_type | Authorization grant (always equal to `client_credentials'). | client_credentials |
| client_id | Client ID (equal to the application.client_id value provided by Mandarin). | VvPtlhcyldKtkuoUWY42 pErdrj4er2AwFoBWrn8n |
| client_secret | The secret key is the client's password (equal to the value application.client_secret provided by Mandarin). | uQfOIMsltZYL8x3XMqUGP5 iFM59PyFnKlN0UmD3Ihre2 Ry3AGazUAv5jPdUI4dBJqV 0Of6b9GFvWvzGahYnq2aVV xkxn9n4qWF57FP0C01Kp6l EtajhfYv3UZ2f4pAZ7 |
| scope | Requested scopes (access areas). The separator is a space.You can request any list of scopes, and the response will return the list of requested scopes that can be provided for this application. | secure:sbp_transaction.read secure:sbp_transaction.write |
curl --location --request POST 'https://accounts.mandarinbank.com/oauth/token/' \
--form 'grant_type=client_credentials' \
--form 'client_id=VvPtlhcyldKtkuoUWY42pErdrj4er2AwFoBWrn8n' \
--form 'client_secret=uQfOIMsltZYL8x3XMqUGP5iFM59PyFnKlN0UmD3Ihre2Ry3AGazUAv5jPdUI4dBJqV0Of6b9GFvWvzGahYnq2aVVxkxn9n4qWF57FP0C01Kp6lEtajhfYv3UZ2f4pAZ7' \
--form 'scope=secure:sbp_transaction.read secure:sbp_transaction.write'
Response:
| Parameter | Description | Example |
|---|---|---|
| access_token | The token (access key). | VnuxZiW14mXBedDeZO7d W7GBmzPxMn |
| expires_in | The validity period of the token (in seconds). It is always equal to 36,000 seconds (10 hours). | 36000 |
| token_type | Token type (always equal to `Bearer'). | Bearer |
| scope | Allowed scopes (access areas). | secure:sbp_transaction.read secure:sbp_transaction.write |
{
    "access_token": "VnuxZiW14mXBedDeZO7dW7GBmzPxMn",
    "expires_in": 36000,
    "token_type": "Bearer",
    "scope": "secure:sbp_transaction.read secure:sbp_transaction.write"
}
Token usage:
It is specified in the headers of each request, in the Authorization field, after the reserved word Bearer.
Authorization:Bearer VnuxZiW14mXBedDeZO7dW7GBmzPxMn
# Request to create a payment transaction
Headers: Authorization: Bearer <your_api_key> Content-Type: application/json
| Parameter | Required | Parameter | Required | |
|---|---|---|---|---|
| payment | yes | customValues[] | no | |
| payment.action | yes | customValues[].name | no | |
| payment.orderId | yes | customValues[].value | no | |
| payment.price | yes | metadata | no | |
| payment.orderActualTill | no | urls | no | |
| customerInfo | yes | urls.return | no | |
| customerInfo.email | yes | urls.callback | no | |
| customerInfo.phone | no* | |||
| allowinteractive | no | |||
| interactive | no |
POST https://secure.mandarinpay.com/api/transactions
{
	"payment": {
		"action": "pay",
		"orderId": "your_unique_order_id",
		"price": "1000.00",
		"orderActualTill": "2020-02-20 12:34:56+00:00"
	},
	"customerInfo": {
		"email": "user@example.com",
		"phone": "+79001234567"
	},
	"customValues": [
		{"name": "first parameter to save and show", "value": "p1"},
		{"name": "second parameter to save and show", "value": "p2"}
	],
	"metadata": {
		"first_parameter_to_callback_and_not_to_show": "p1",
		"second_parameter_to_callback_and_not_to_show": "p2"
	},
	"urls": {
		"callback": "http://...",
		"return": "http://..."
	}
}
Response in case of successful transaction creation (200 OK):
{
	"id": "43913ddc000c4d3990fddbd3980c1725",
	"userWebLink": "https://secure.mandarinpay.com/Pay?transaction=0eb51e74-e704-4c36-b5cb-8f0227621518",
}
Response Parameters:
userWebLink- not used for Custom Formid- is the created transaction, this id must be used in the next request for the SBP
Response if no transaction has been created (400 Bad request):
{
	"error": "Invalid request"
}
# Request to generate a qrCodeUrl
We use the transaction id from the previous request, and also specify the Mid of your project in the header.
curl --location --request POST 'https://secure.mandarinpay.com/api/public/sbp/43913ddc000c4d3990fddbd3980c1725' \
--header 'Mid: 1234'
Response in case of successful transaction creation (200 OK):
{
   "qrImage":"iVBORw0KGgoAAAANSUhEUgAAASwAAAEsCAYAAAB5fY51AAAnlUlEQVR4Xu3d+7OvZ1.................=",
   "qrUrl": "https://qr.nspk.ru/AD1P0012E6EDIC7378VFR6H3HDFF98TIP?type=02&bank=100000000010&sum=10&cur=RUB&crc=AFF5",
    "state": "pendingconfirmation"
}
Response Parameters:
qrImage- opens the QR code for scanning, we show it to the payer using the Custom FormqrUrl- payment page, alternative to QRstate- payment status
# Request for the SBP payment status
STATUS REQUEST RULES
- Interval: 5 seconds (minimum — 2 seconds).
- Terminate the status request upon receipt: success/failed
- Limit: 30 minutes (if the pending status is longer than 30 minutes, the operation is considered unsuccessful).
Description of statuses:
| Status | Description |
|---|---|
| success | Payment was successful, funds were debited from the payer's account |
| failed | The payment was rejected (see error details in transaction monitoring (opens new window)) |
| pending | Waiting for payment (the payer has not performed any actions for payment yet) |
curl --location --request GET 'https://secure.mandarinpay.com/api/public/sbp/43913ddc000c4d3990fddbd3980c1725/status' \
--header 'Mid: 1234'
Response if successful:
{
    "status": "success"
}
Response in case of failure:
{
    "status": "failed"
}
Response in case of waiting for payment:
{
    "status": "pending"
}
# Interactive payment as an example of a Custom Form implementation
Interactive payment uses card token. Unlike the usual recurrent payment, in the case of interactive payment the user enters CVV/CVC code. To implement a CVV/CVC code entry form, you must use the Custom Form technology.
So you can use full card data token even if it is in [status](./api_tokenization.md#tokenization-full-card data) payout-only and for payment in the scheme odno-stage payment, and for authorization in the two-stage payment scheme.
Interactive payment can be implemented in two ways:
interactive. Payment will be made interactively regardless of the token status. To do this you need to pass"interactive": true.allowinteractive. Payment will be made using auto debit (recurring payment). If the token is in thepayout-onlystatus, then it will be executed interactively. To do this, you need to pass"allowinteractive": true.
Payment occurs in two stages:
Initiation (interactively via API).
Creating a transaction (using Custom Form).
# Initiation
As an example, consider the request payment using a saved card in interactive mode, where "interactive": true.
To request [payment using a saved card without entering a CVV/CVC code and without going through 3-D Secure](./api_peyments.md#payment-using-saved-card-without-entering-cvv-cvc-code-and-without -pass-3-d-secure), where "allowinteractive": true, the same parameters must be used.
The synchronous response contains the payment id, and the jsOperationId for creating a transaction via Custom Form.
Interactive payment request for one-step payment
POST https://secure.mandarinpay.com/api/transactions
{
"payment": {
"action": "pay",
"orderId": "your_unique_order_id",
"price": "1000.00"
},
"target": {
"card": "0eb51e74-e704-4c36-b5cb-8f0227621518"
},
"interactive": true,
"customValues": [
{"name": "first parameter to save and show", "value": "p1"},
{"name": "second parameter to save and show", "value": "p2"}
],
"metadata": {
"parameter to callback and not to show 0": "0",
"parameter to callback and not to show 1": "1"
},
"urls": {
"callback": "http://...",
"return": "http://..."
}
}
Request interactive authorization for two-step payment
POST https://secure.mandarinpay.com/api/transactions
{
"payment": {
"action": "preauth",
"orderId": "your_unique_order_id",
"price": "1000.00"
},
"target": {
"card": "0eb51e74-e704-4c36-b5cb-8f0227621518"
},
"interactive": true,
"customValues": [
{"name": "first parameter to save and show", "value": "p1"},
{"name": "second parameter to save and show", "value": "p2"}
],
"metadata": {
"parameter to callback and not to show 0": "0",
"parameter to callback and not to show 1": "1"
},
"urls": {
"callback": "http://...",
"return": "http://..."
}
}
Response in case of successful initiation (200 OK)
{
"id": "43913ddc000c4d3990fddbd3980c1725",
"jsOperationId": "9874694yr87y73e7ey39ed80"
}
Response if initiation does not occur (400 Bad request)
{
"error": "Invalid request"
}
# Create a transaction
The jsOperationId received in the synchronous response as part of the previous request must be used to create a transaction through the Custom Form.
In this case, only the CVV value needs to be passed. Transfer of other card data is not required.
A detailed description is in the relevant section.
Creating a transaction via Custom Form
The HTML form matches the one used for the full payment form, just removing all fields except the CVV field:
<form id="form-hosted-pay">
   <div style="margin: 10px; padding: 10px; border: 1px solid gray">
     CVV:
     <div class="mandarinpay-field-card-cvv hosted-field"><div class="glyphicon glyphicon-check"></div></div>
     <br/>
     <a href="#" onclick="return mandarinpay.hosted.process(this);" class="btn btn-default">Pay</a>
   </div>
</form>
The form is initialized in exactly the same way as the standard payment form is initialized. The same events, hooks, styling, etc. are supported as in the standard form. Example:
<script>
mandarinpay.hosted.setup("#form-hosted-pay", {
   operationId: "9874694yr87y73e7ey39ed80",
   onsuccess: function(data) {
     alert("Success, id: " + data.transaction.id);
   },
   onerror: function(data) {
     alert("Error: " + data.error);
   }
});
</script>