# Ready integrations
The section contains applications with ready-made integrations, CRM, CMS, ERP plugins and instructions for them. Plugins for the CMS are hosted on the GitHub service; applications can be downloaded from the links provided in the sections. You can work with the plugin source code, which is located in the same repository where the archive files are located. If the plugin you need is not in the list, contact Support (opens new window), we will try to help.
PLEASE ATTENTION!
Plugins for CMS are implemented based on API requests. If you want to modify the plugin, check out the API reference.
# All integrations
You can find all the ready-made integration solutions at link (opens new window). Here you will find a complete list of available solutions and be able to choose the most suitable option for your tasks.
# amoCRM
# Installing a widget in amoCRM
You can install the widget in two ways:
# 1.Installation via amoMarket
To do this, you need to open the “amoMarket” section, write “Mandarin” in the search bar and click the “Install for free” button in the widget block.

Next, check the box according to the screenshot and click the “Install” button.
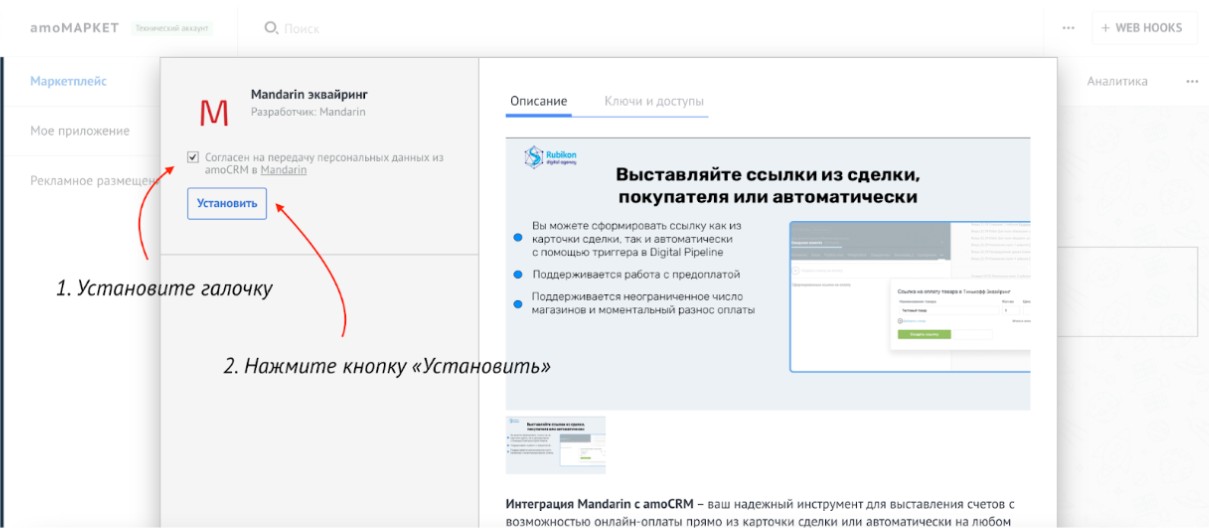
Great! Now the widget is installed and you can go to its settings.
# 2.Install via link
To install the widget, open Link (opens new window) Select the amoCRM account into which you want to install the widget and click the “Allow” button
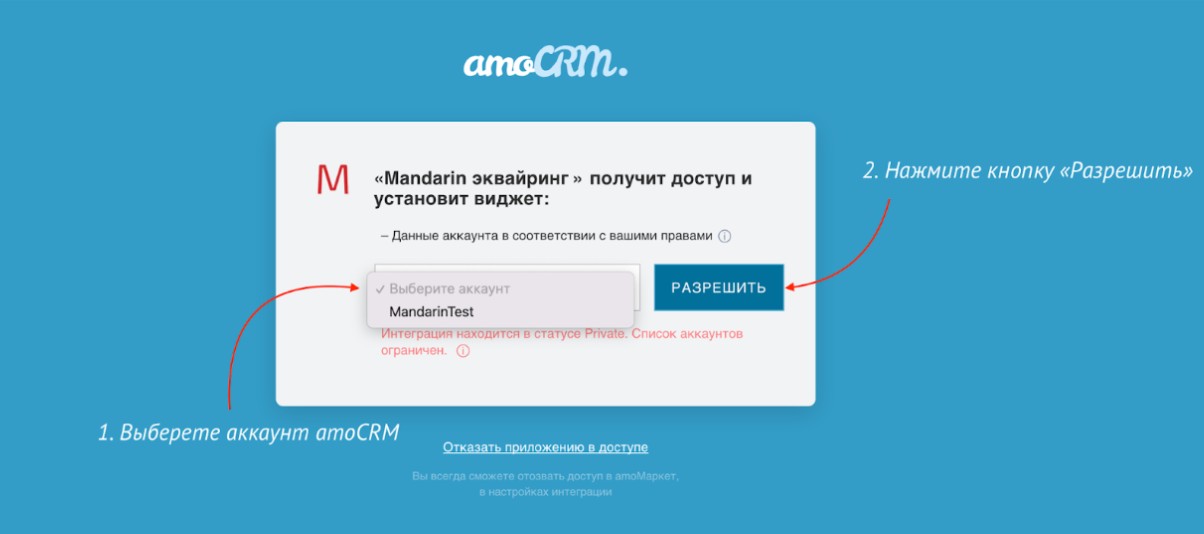
After clicking the button, the widget will automatically be installed in your account and will be available for configuration.
# Initial widget setup
# Connecting and setting up stores
To connect a store, you need to open the “Settings” section in the widget and then open the “Stores” section
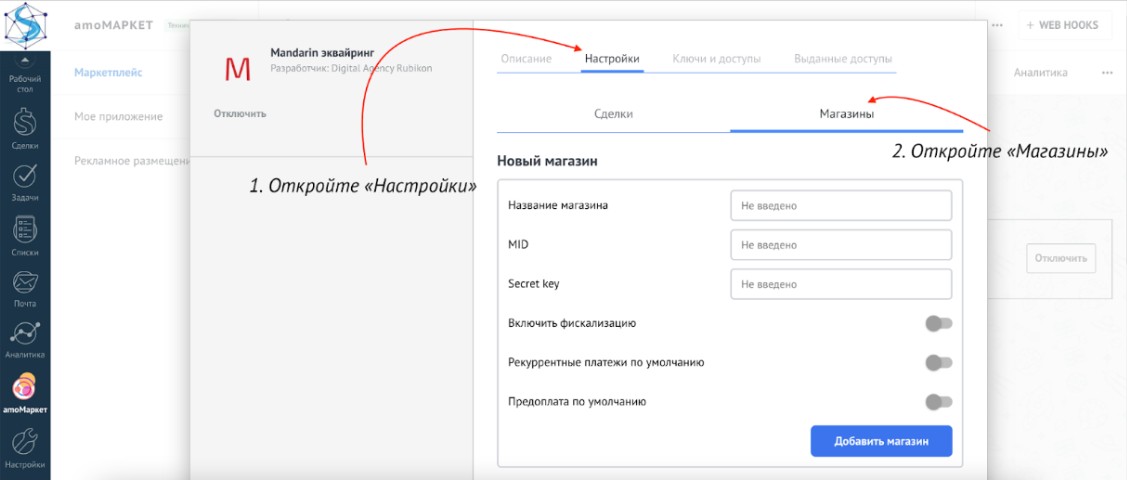
The widget has no restrictions on the number of connected stores.
To add a new store you need:
- Enter any arbitrary value in “Store name”
- Specify the “MID” parameter that you received from Mandarin technical support
- Specify the “Secret Key” parameter that you received from Mandarin technical support
To complete the addition, click the “Add store” button.
Important!
To save the settings, click the “Save” button. Otherwise, after exiting the widget settings, no entered data will be saved.
Additionally, both when creating and editing store settings, you can:
Activate fiscalization To do this, you need to click on the checkbox to the right of the text “Enable fiscalization” and fill in the following data: 1.1 Tax system 1.2 VAT rate 1.3 Calculation method 1.4 Subject of calculation After filling in all the data as a result of payment, the acquiring company will generate checks and send them to the client, as well as to the Federal Tax Service (if you have set up an online cash register in the Mandarin account)
Activate a function of your choice (only one function from the proposed ones can be activated at a time): 2.1 Recurring default payments When you activate this checkbox in the window for generating payment links, the recurrence of payments will be automatically set, which you can also deactivate if necessary - this function is only responsible for the “default” setting. 2.2 Prepayment by default When you activate this checkbox in the window for generating payment links, the “Advance payment” criterion will be automatically set for the payment, which you can also deactivate if necessary - this function is only responsible for the “default” setting.
# Setting up field matching
To make the settings, you need to open the “Settings” section in the widget, then click on the “Transactions” button, and then click on the “Field Settings” button
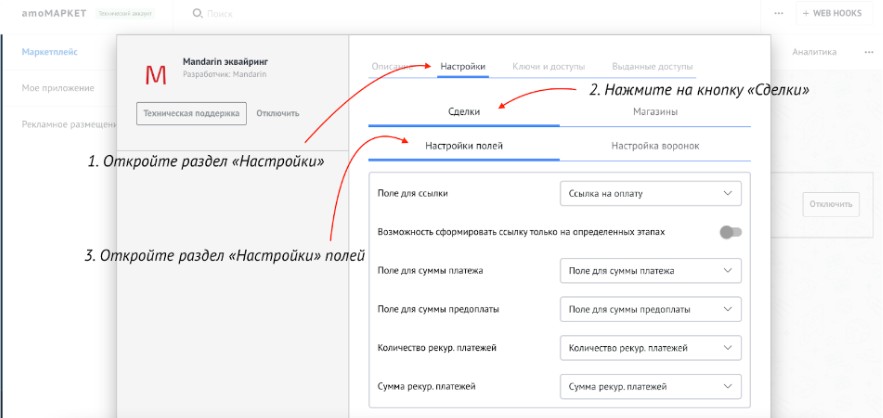
The widget is a way to insert data such as:
Payment link The last generated link for payment within this transaction is inserted
Payment amount Total amount of payments made by the client
Prepayment amount The total amount of prepayments made by the client (when creating a payment link with the “Prepayment” parameter)
Number of recurring payments Total planned number of recurring payments
Amount of recurring payments Total planned amount of recurring payments
To set up field matching, you first need to create these fields in the deal card. If you have already made some settings in the widget, be sure to click the “Save” button so that the entered data is not lost.
Provided that the fields you need are available in the deal (if you have already created them, or they were there previously), select these fields in the list of available fields, which is displayed to the right of the corresponding parameter.
Important!
To save settingsYou must click the “Save” button. Otherwise, after exiting the widget settings, no entered data will be saved.
# Setting up automatic status change when paying
If payment is successful using the generated link, the widget is able to change the status of this transaction both in case of full payment and in case of prepayment.
To set up this function, you need to open the “Settings” section in the widget and then click on the “Deals” button, and then on the “Funnel setup” button
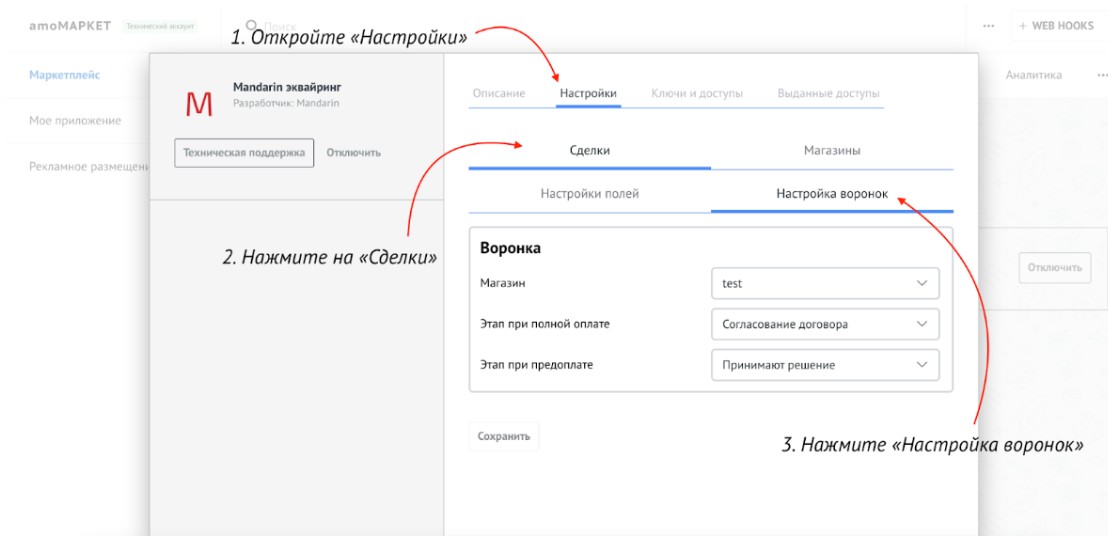
After opening this section, you can provide information such as:
Default store Select from the list of previously added stores the store that you want to be automatically selected in the link generation window in this funnel
Stage upon full payment Select from the list the stage to which you want transactions to move in case of full payment
Prepayment stage Select from the list the stage to which you want transactions to move in case of prepayment
Important!
To save the settings, click the “Save” button. Otherwise, after exiting the widget settings, no entered data will be saved.
# Using the widget
# Generating a payment link
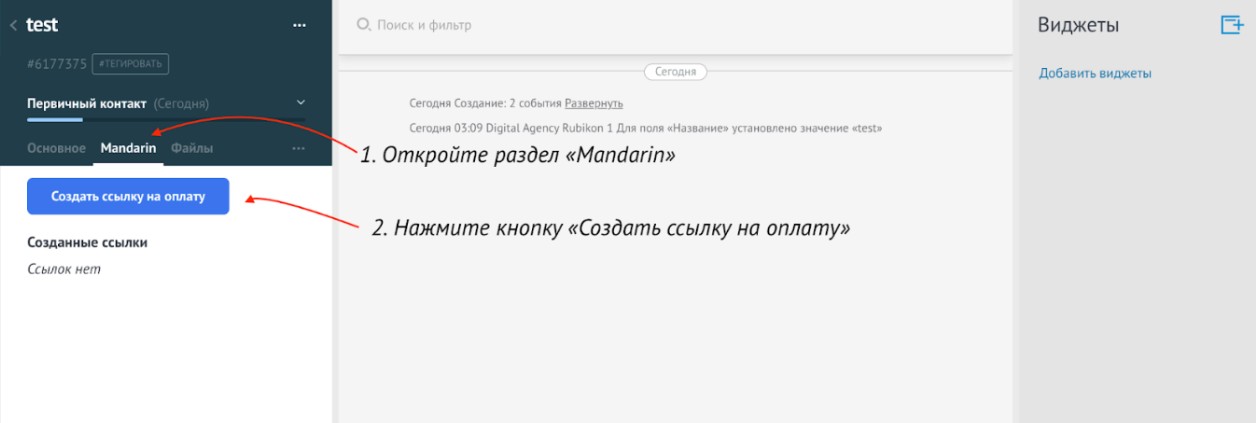
To generate a payment link, you need to open a transaction in amoCRM within which you want the link to be generated. Next, select the “Mandarin” section and then click on the “Create payment link” button
# Adding a product in the link generation window
Next, you need to add the product in the link generation window. To do this, click the “Add Product” button and select a product from the list of available ones This list displays products that you previously added to the “Products” list inside amoCRM
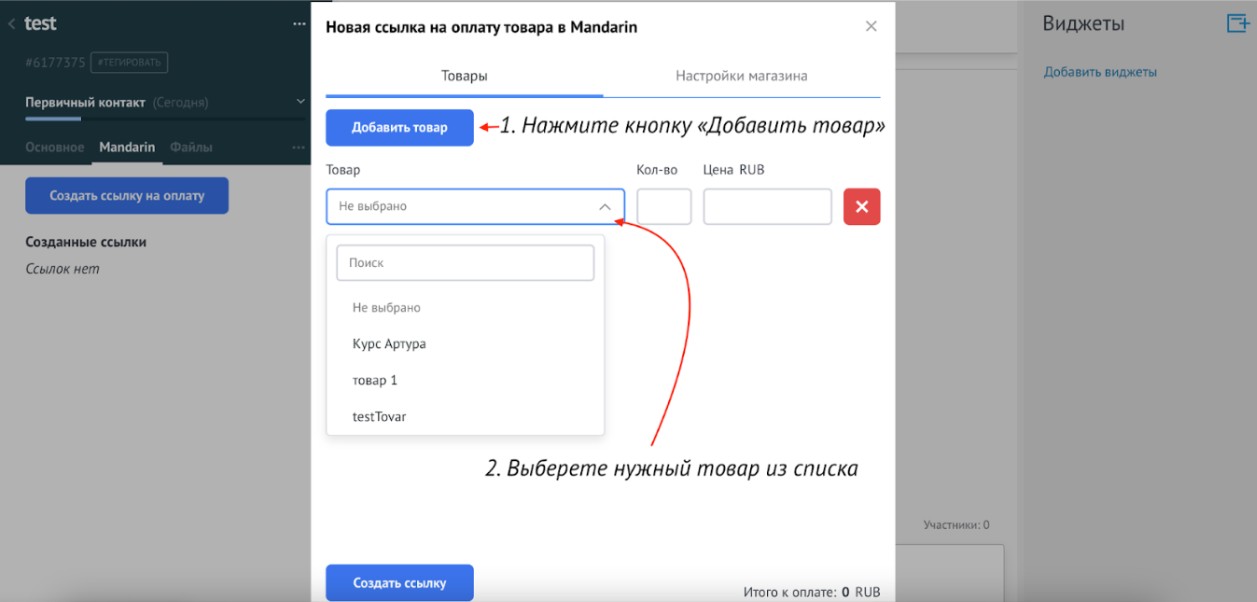
After adding a product, you will automatically have a price and quantity that you can edit.
# Setting up the generated link
When opening the “Store Settings” section, you can specify information such as:
Store This item displays a list of previously added stores, and also defaults to the store that you selected in the funnel settings
Activation of the recurring payments function When this checkbox is activated, the generated link will have a recurrence function and the client will be periodically debited in the amount that you specify in the “Number of payments” item.
Activate the prepayment function If you work with prepayments, then after activating this checkbox you will have the opportunity to specify the “Prepayment Amount”. In this case, the link will initially display the amount indicated as an advance payment and after making it within the same link, the client will be able to make the remaining payment.
After specifying all the data, click on the “Create link” button. If no errors occur, a link will be generated in accordance with the data you previously specified. As a result of creating the link:
- The generated link will appear in the “Created Links” list
- The last generated link will be automatically inserted into the transaction field that is specified in your settings
# Working with the generated payment link
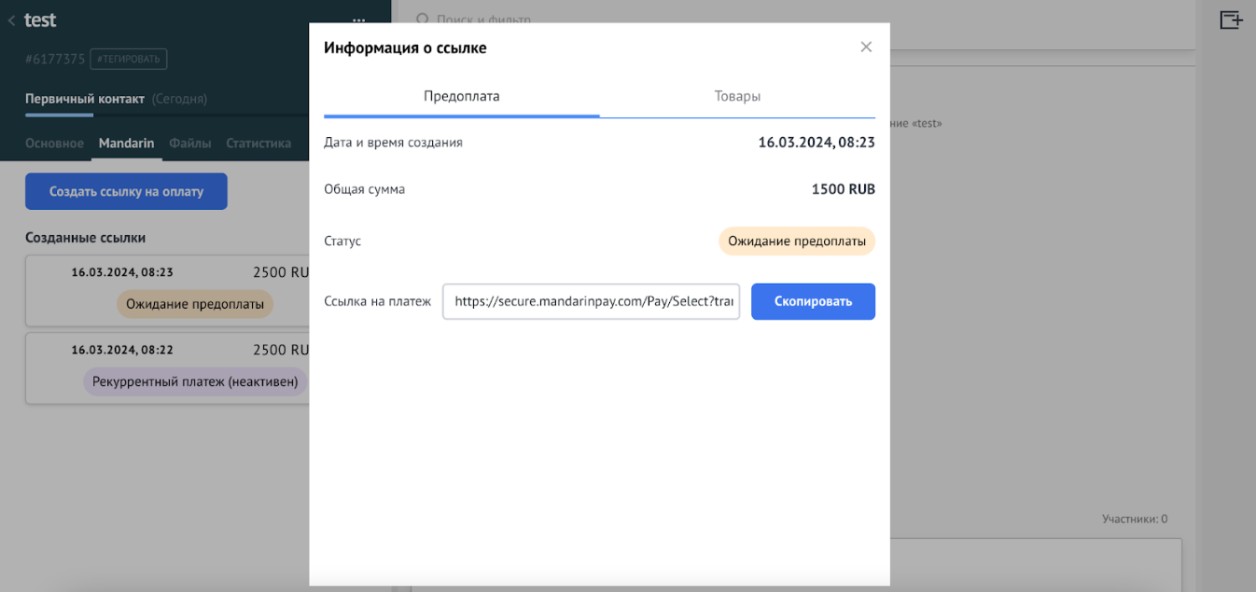
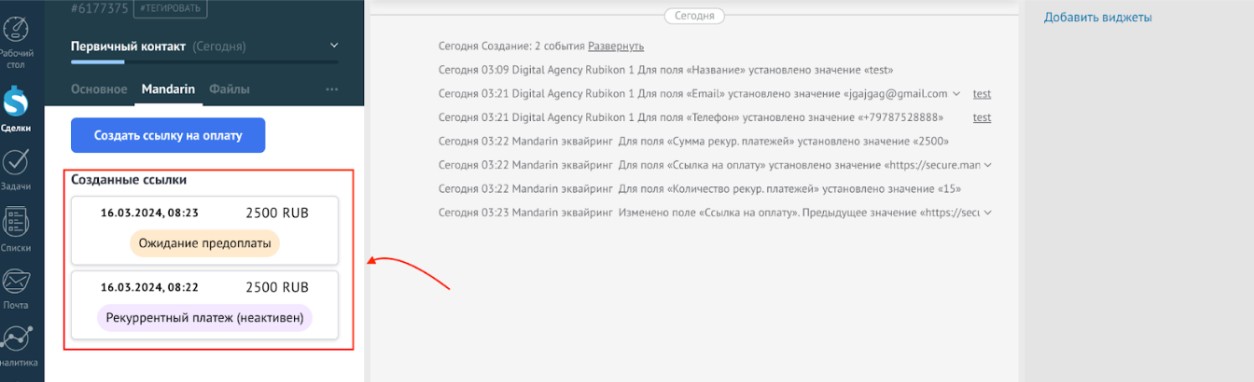
The generated link will appear in the “Created Links” block. At any time you can open information by clicking on the block with the link you need

Within this block you will have the opportunity to copy the link in order to send it to the client
# Links with recurring payment
After making the first payment using the link, the client agrees to make all subsequent recurring payments. Write-offs will occur automatically. To cancel a recurring payment, you need to open a transaction within which this link was generated. After that, click on the block with a link with the “Recurring payment” attribute and then click on the “Cancel” button

# Automatic payment posting
After making the payment, the widget will automatically change the status of the transaction within which the link was generated to the status that you selected in the “Funnel Settings” section in the widget settings
It is also possible to move a transaction step by step if the “Prepayment” option is activated at the time the link is generated. In this case, the transaction will first change its status to the one specified in the settings as for the “Advance payment” status, and after making full payment, it will change to the status specified as for “Full payment”
When you open a transaction in the “Created Links” list, you will see the current payment status for the generated link.
# Bitrix24
- Payment plugin (opens new window).
- Installment plugin (opens new window). Each plugin specifies its own payment system, if two plugins are installed, the user will have a choice - Installment and Card payment.
- Instructions (opens new window).
# Start
Install the plugin, links above.
Before you start setting up the Mandarin payment system module, you need to register your personal account on the platform (opens new window), instructions for creating a personal account can be found here (opens new window). After registering in the Mandarin account, open your project page and specify the value “https://mandarinio.bkvsoft.com/mandarin/app/Classes/UrlStarter.php?type=callback” without quotes as the “callback sending address” parameter.

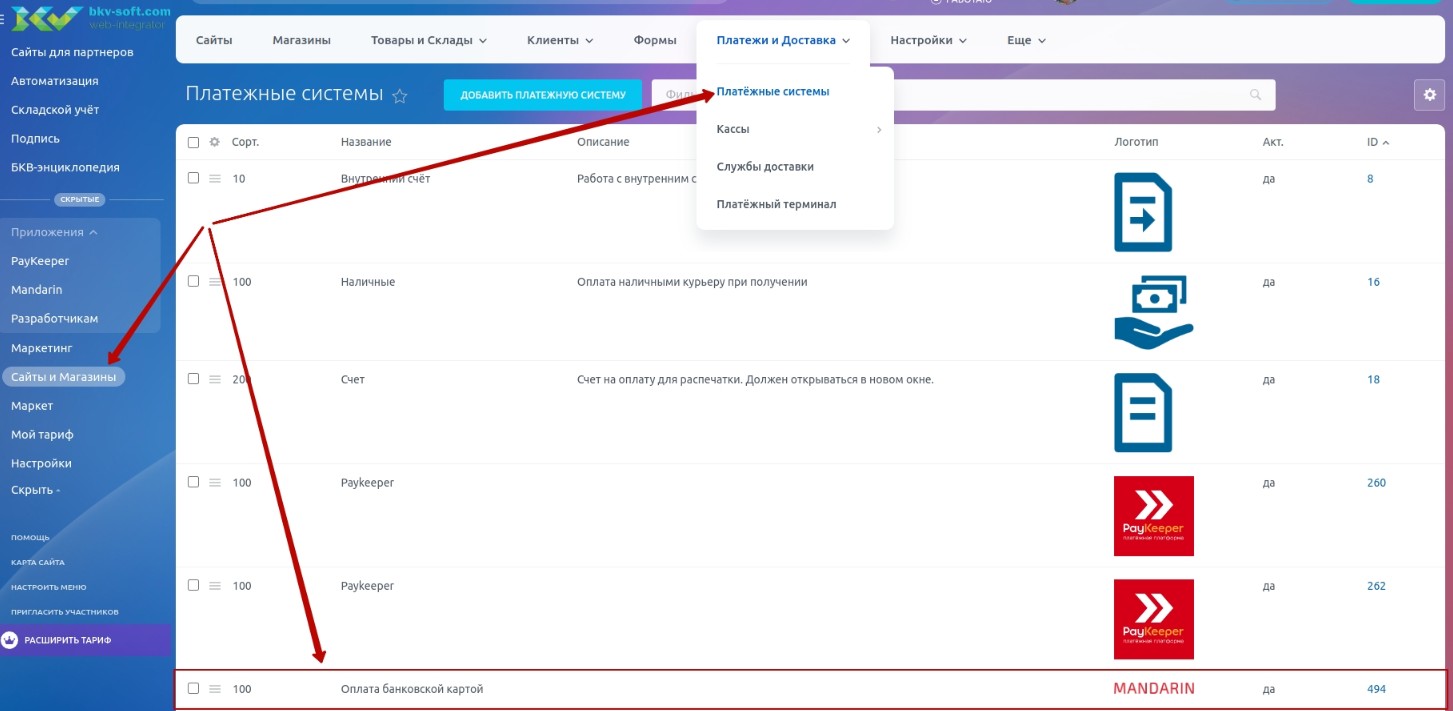
To configure the "Mandarin" payment system module, go to the "Sites and Stores" section by selecting the appropriate item from the left menu of the CRM portal. On the page that opens, select the "Payment systems" item from the drop-down list of the "Payments and Delivery" item in the top menu (Fig. 1). If the module has been successfully installed, the "Mandarin" payment system for the payer's physical type will appear in the list on the payment systems page. Select the payment system you need to configure and double-click on the name (or select “Edit” from the context menu) to change its parameters.
# Setting up a payment system for card payments
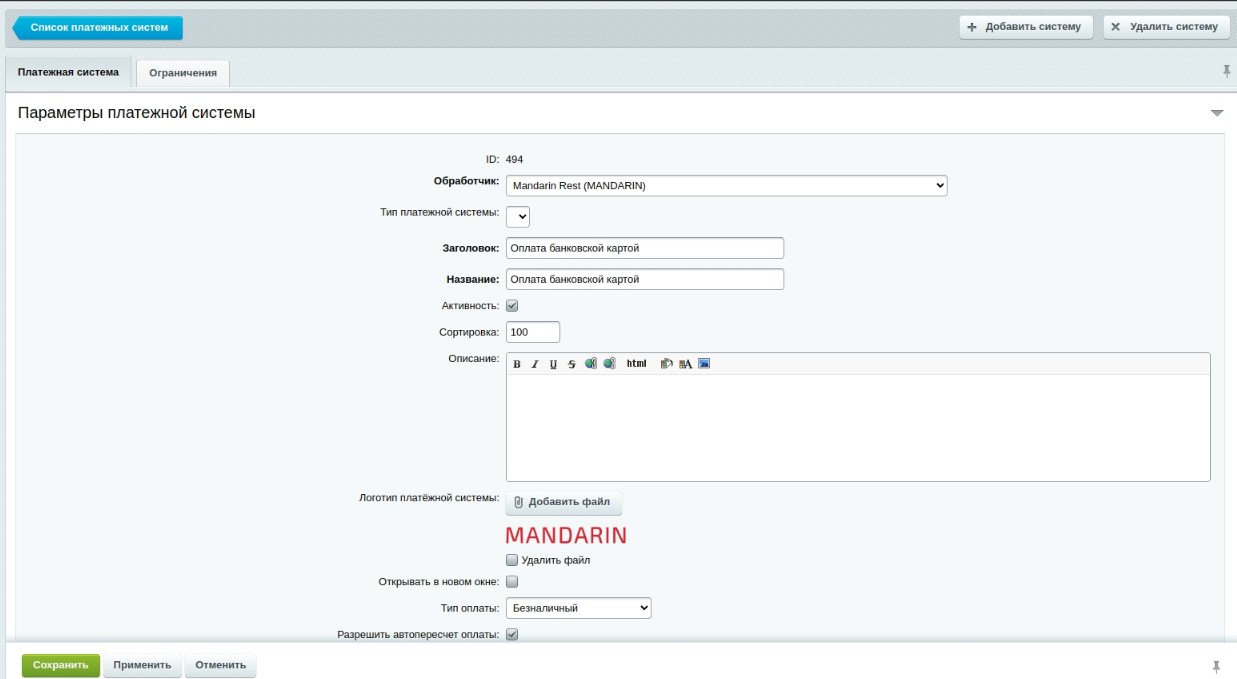
On the "Payment system" tab, fill in the fields as follows (Fig. 2):
Handler: Mandarin Rest (MANDARIN)
Payment system type: leave blank by default
Heading: Payment by bank card
Title: Payment by bank card
Activity: set flag
Sorting: set as desired
Description:
Payment system logo: Loaded logo
Open in new window: leave as default
Payment type: Cashless
Allow automatic payment recalculation: leave as default
Allow receipt printing: leave as default
Encoding: leave as default
Code: leave as default
External code: MANDARIN
# Setting up the PS handler
On the tabs of the "Setting up the PS handler" section, to configure all fields, you need to expand their display by clicking on the "Show all" link. To set up the Mandarin payment system, fill in the fields in the “Individual (s1)” tab. If any field on the tab ("Individual (s1)") has the "Default" flag set, then the value of this field will be taken from the corresponding field in the "Default" tab of the current payment system. Otherwise, the value that was specified directly in the field of this tab is taken into account (Fig. 3).
MID* (required) - Value (filled in from the MID field of your personal account on mandarinpay.com)
Secret* (required) - Value (filled in from the Secret-Key field of your personal account on mandarinpay.com)
Site domain* (required) - Value (indicate the site domain in the site.ru format without https://)
Payment type* (required) - One-stage or Two-stage optional
Transaction stage for debiting funds - The name of the stage, when transferring the transaction to which the frozen amount will be debited from the client’s account if the “Two-stage” payment type is selected. ATTENTION! The debit will be made for ALL active payments related to this transaction (created with a two-stage payment type).
Transaction stage for refund - Name of the stage, when transferring the transaction to which the frozen amount will be returned to the client’s account if the “Two-stage” payment type is selected. ATTENTION! A refund will be issued for ALL payments related to this transaction (created with a two-step payment type) that were not charged.
The fields in the "Payments" section should be left filled with default values.

# Restrictions
On the "Restrictions" tab for the Mandarin payment system (Individual), the payer type "Individual" will be set automatically
# Setting up a payment system for installments
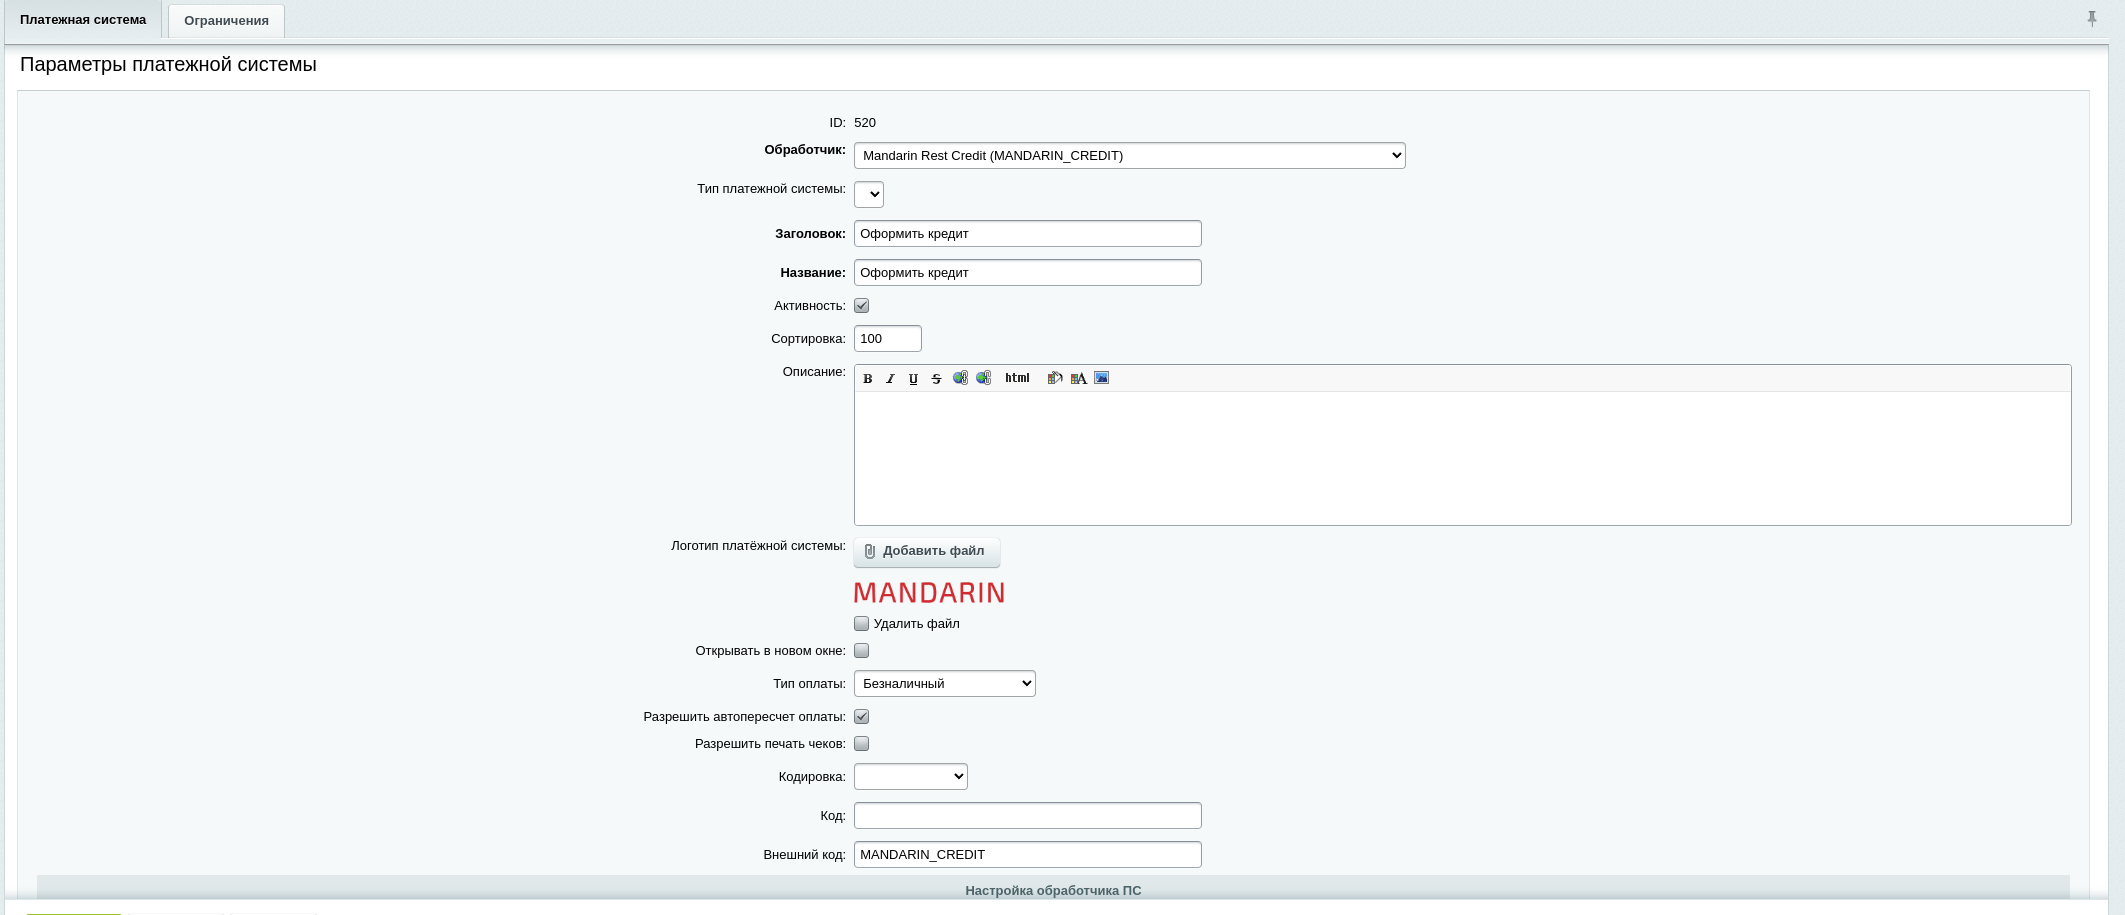
On the "Payment system" tab, fill in the fields as follows:
Handler: Mandarin Rest Credit (MANDARIN_CREDIT)
Payment system type: leave blank by default
Heading: Apply for a loan
Name: Apply for a loan
Activity: set the flag
Sorting: set as desired
Description:
Payment system logo: Uploaded logo
Open in a new window: leave by default
Payment type: Non-cash
Allow automatic recalculation of payment: leave by default
Allow printing of receipts: leave by default
Encoding: leave by default
Code: leave by default
External code: MANDARIN_CREDIT
# Setting up a PS handler for installments
In the tabs of the "PS Handler Setup" section, to configure all fields, you need to expand their display by clicking on the "Show all" link. To configure the Mandarin payment system, fill in the fields of the "Individual (s1)" tab. If any field on the "Individual (s1)" tab has the "Default" flag set, the value of this field will be taken from the corresponding field of the "Default" tab of the current payment system. Otherwise, the value that was specified directly in the field of this tab is taken into account.
API key* (mandatory to fill) - Value (you need to request it from Support Service (opens new window))
Website domain* (mandatory to fill) - Value (the site domain is indicated in the format site.ru без https://)
The page the client will be redirected to after the loan is approved* (required) - indicates the link where the client will be redirected after the loan is successfully processed, must start with https://
The page to which the client will be redirected in case of refusal of credit* (mandatory) - the link to which the client will be redirected if the credit is refused is indicated, it must start with https://
The fields in the "Payments" section should be left filled in with the default values.
# Restrictions
On the "Restrictions" tab for the Mandarin payment system (Individual), the payer type "Individual" will be set automatically.
# GetCourse
Mandarin specialists configure the Getcourse integration. You need to collect the data below and complete the settings.
# 1. Mandarin data
After your account is activated and services are enabled, universal payment links are available in Links (opens new window).
Choose the link with the service you need (installment, credit, installments/splits), open Actions → View details.
In link settings, scroll to Integration. Enable Enable API integration and Create new API key.
You may name the key e.g. Getcourse integration.
The link ID is in the browser URL while settings are open: https://business1.mandarin.io/invoices/link/{link_id}
Save the API key and link ID to a separate file.

# 2. Getcourse data
Save the following from your Getcourse account:
getCourseBaseUrl— account base URL (e.g.https://mandarin.getcourse.ru).
Important!
The URL must end with .getcourse.ru — use the account base URL only. If you use a landing page URL, the integration will break when the landing is updated.
getCourseToken— Getcourse API token.
Open https://*.getcourse.ru/saas/account/api (replace * with your account name). Under “Create a new key”, enter a key name, check “For reading and writing”, click “Generate secret key”, copy and save it.

- Create an admin user for getcourse@mandarin.io and save the password (set it via Change password after adding the user). This is required for order/payment status sync and editing the system payment page.

# 3. Submit the request
Send all collected data to your Mandarin manager, technical account manager, or support (opens new window) (website form or Telegram).
# Plugin 1C
# Instructions for loading the module
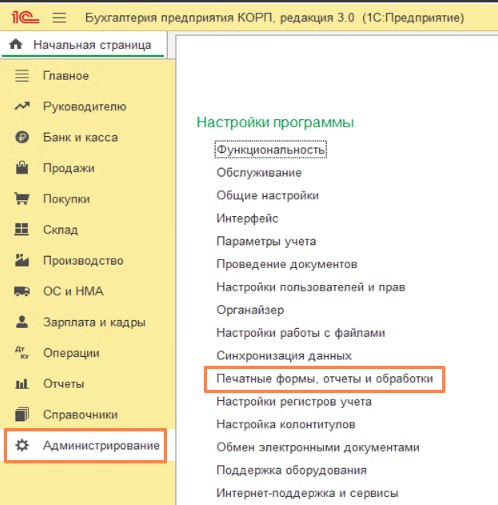
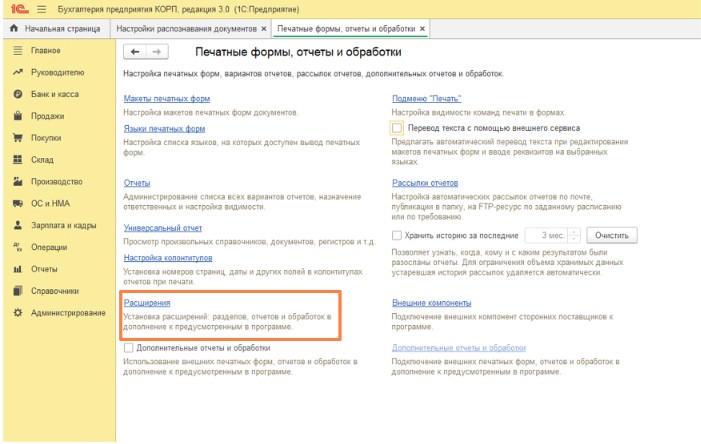
You need to load the extension into the client database; to do this, go to the “Administration” section - “Printed forms, reports and processing”.
Then go to “Extensions”
In the window that opens, click “Add from file” and specify the path to the file and click “Open”.
Important!
It is necessary for everyone to exit the database before loading the extension!

Next there will be a window for applying the extension.
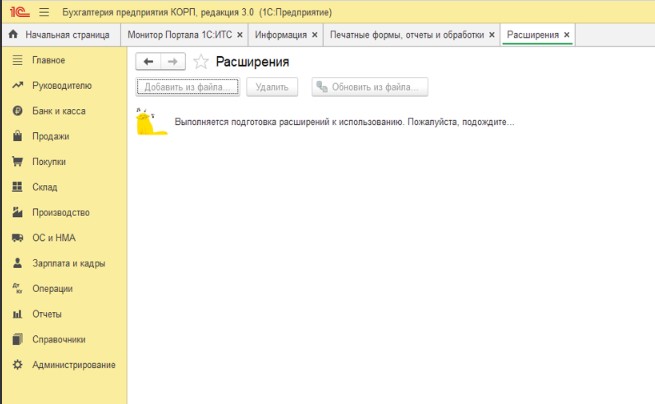
After successful application of the extension, a message will appear indicating the need to restart the program into the database.
Important!
REMOVE THE "Safe Mode" FLAG!
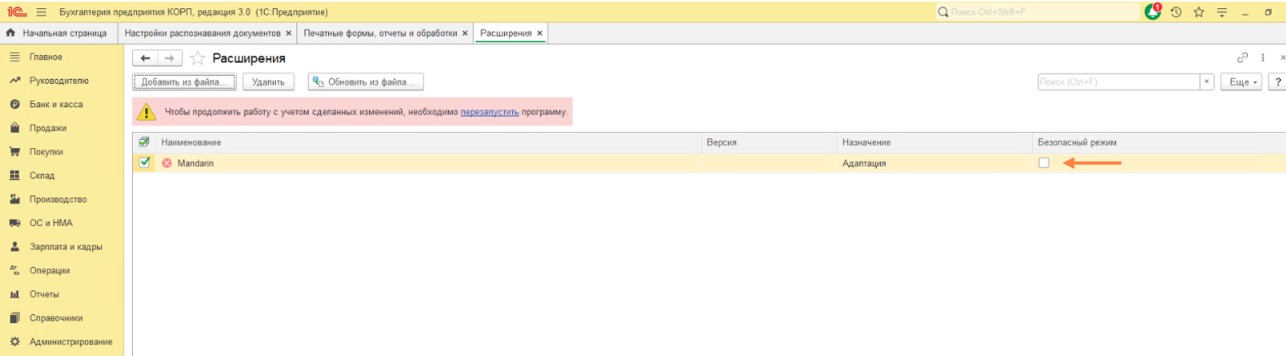
After successful addition and restart, Mandarin will appear.
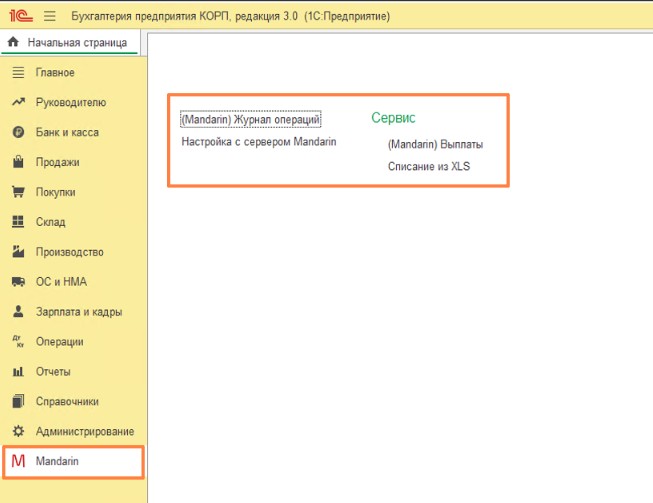
# Adding store settings in 1C
After successfully adding the extension, we configure the module. We go into the “Mandarin” subsystem - setup with the Mandarin server.
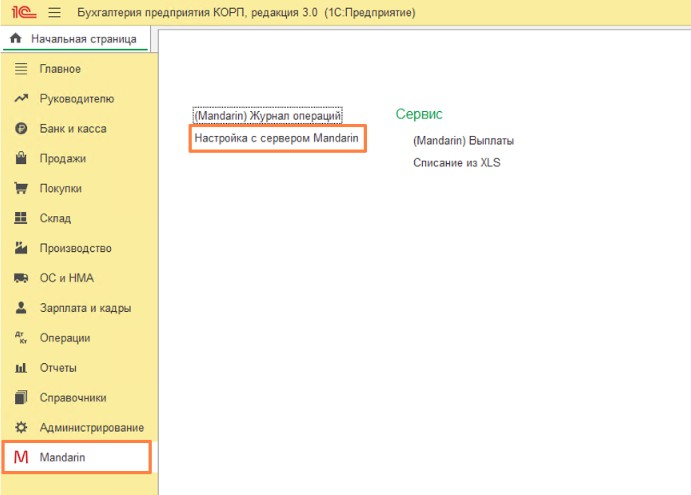
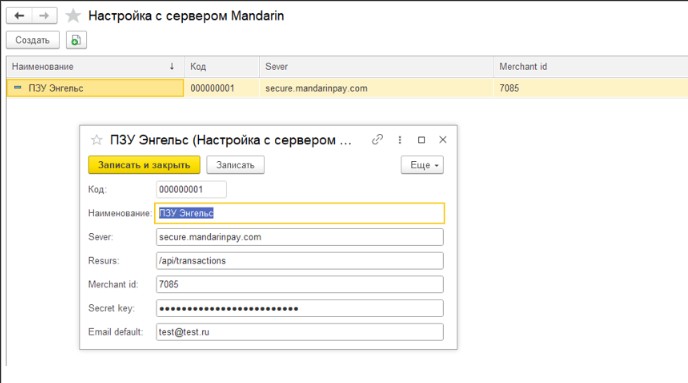
Let's create a new project setting. Ideally, as many platforms as there are as many settings.
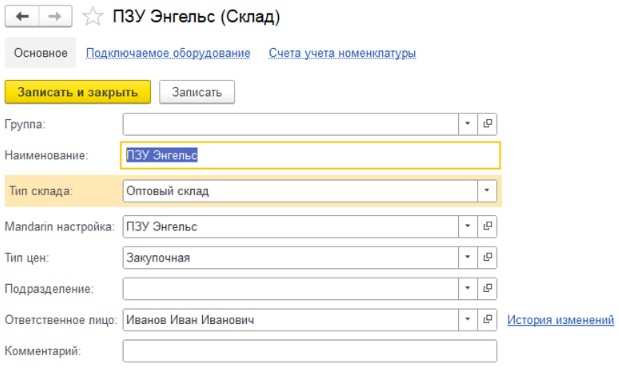
If there are many sites, then for the convenience of the user you need to go to the warehouse and install the tincture in a specific warehouse. To do this, go to the “Directory” - “Warehouses” subsystem and go to the desired warehouse.

Selecting a setting in the warehouse
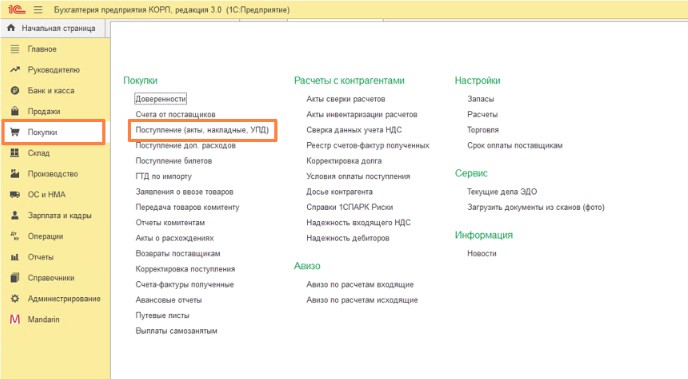
Then we try to pay from 1C to the card number of an individual. We go to the subsystem “Purchases” - “Receipts (acts, invoices, UPD).
Let's create a new document.
Important!
The card payment button is only available in products!
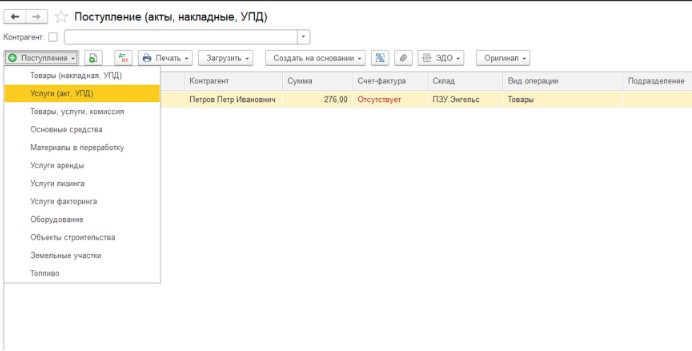
Fill in the required fields and click “Pay via Mandarin”.
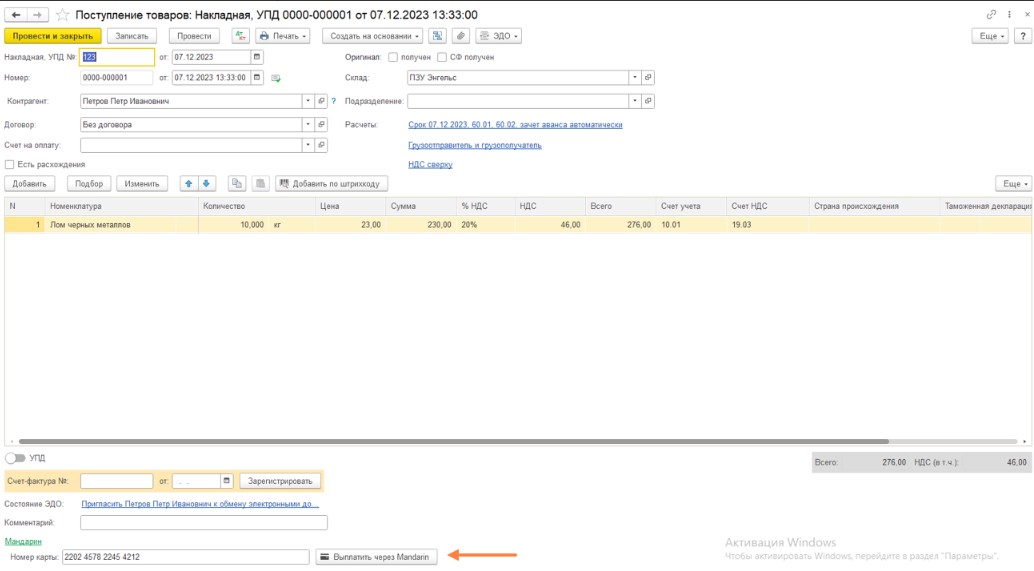
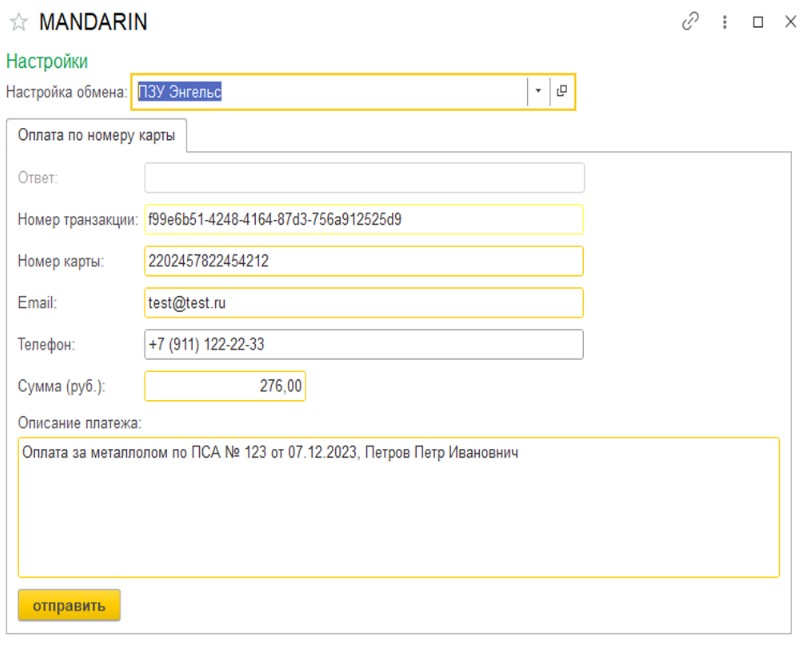
The Mandarin payment window will open.
Important!
To ensure that the fields are filled out as much as possible, check that all fields are filled in in the exchange settings, in the warehouse and in the counterparty itself!
Information about successful and unsuccessful operations will be recorded in the operation log.
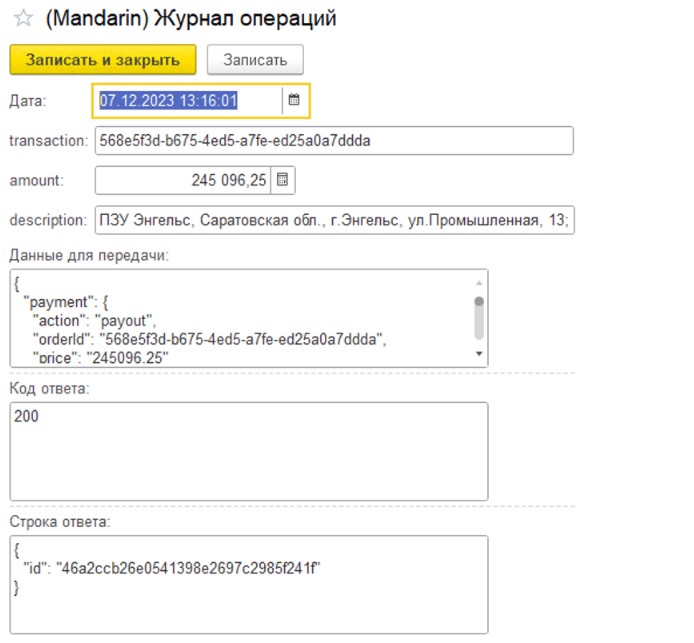
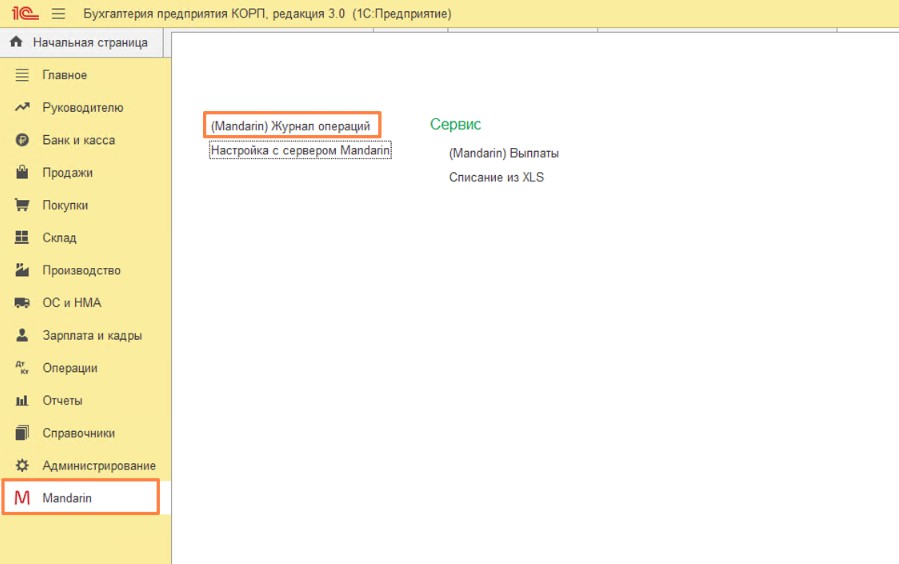
It can be found in the section "Mandarin" - "Operation Log"
# Downloading an extract from the MANDARIN system
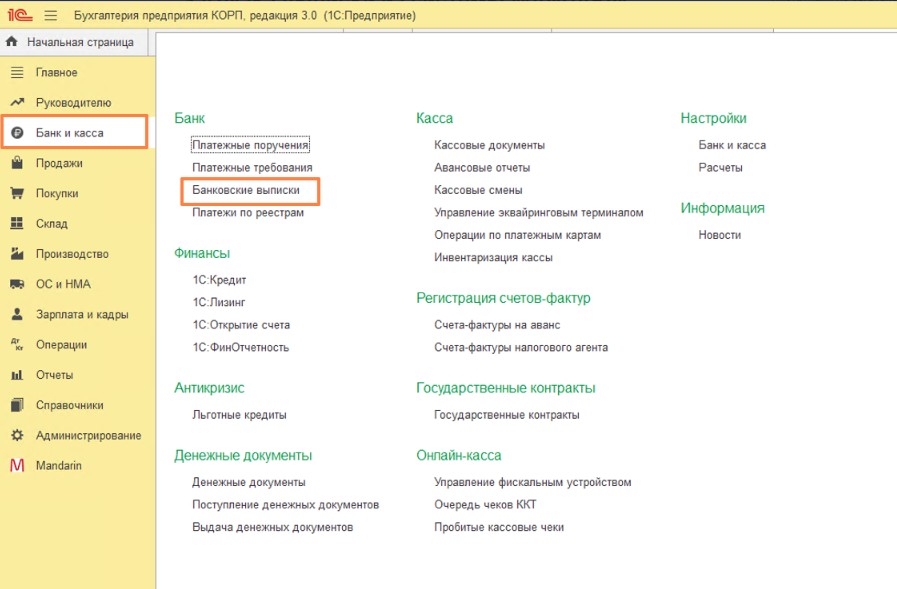
If the extension is successfully added, the “Download from Mandarin” button will appear in the “Bank and Cash Office” - “Bank Statements” section

When you click on it, the form opens:
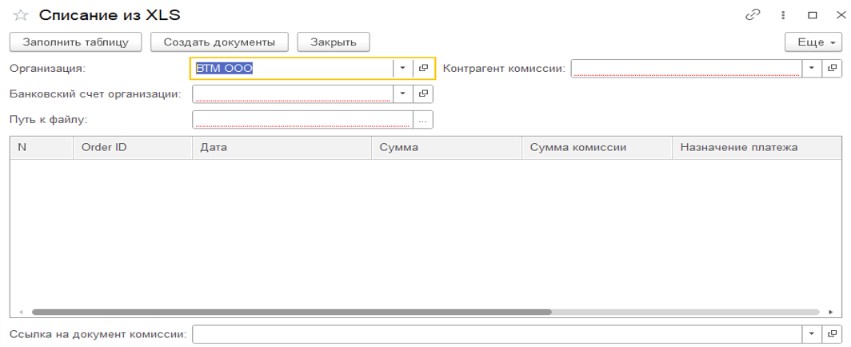
We indicate the organization, bank account and counterparty of the commission, as well as the path to the file downloaded from the Mandarin system and click “Fill in the table”.

Click “Create Documents”, after which documents for debiting from the current account will be created, as well as a general commission document for these operations.
# Salebot
Detailed instructions on how to connect the Mandarin payment system to Salebot are available at link. (opens new window).
# 1cbit
# BIT.Debt management
In the CRM system for debt collection "BIT.Debt Management" from the company 1cbit, it is possible to connect functionality that allows you to increase the conversion of payments on debt obligations of individuals.
Submit a request for a demonstration of integration capabilities here (opens new window)
Integration of Mandarin and BIT.Debt Management allows you to:
- Receive and record payment information online;
- Connect auto payment to the debtor’s card with the highest conversion;
- Send a direct link to pay the debt by email or SMS;
- Set up automatic debits from the card according to the payment schedule.
The operator, in a conversation with the debtor, agrees on the amount that he is ready to repay. Then it sends a message, the link from which leads to the payment form. The payment made will be instantly reflected in the BIT.Debt Management software. Connecting automatic payment to the debtor’s card will significantly speed up collection and save the debtor from unnecessary costs for providing information via SMS, email and calls.
Integration from the application to the start of using the functionality takes 1-3 business days and depends on the speed of data provision.
# What needs to be configured before integration begins:
- Mandarin combat account;
- BIT.Debt management program.
To configure the system, contact a specialist in the implementation department or the supervising manager at First BIT.
Self-configuration is also possible, the detailed process is described in the instructions from the First BIT company at link (opens new window).
# Skillspace
# 1. Mandarin data
After your account is activated and services are enabled, universal payment links are available in Links (opens new window).
Choose the link with the service you need (installment, credit, installments/splits), open Actions → View details.
In link settings, scroll to Integration. Enable Enable API integration and Create new API key.
You may name the key e.g. Skillspace integration.
The link ID is in the browser URL while settings are open: https://business1.mandarin.io/invoices/link/{link_id}
Save the API key and link ID to a separate file.
Also enable Send callbacks (Webhook) and set the URL to https://skillspace.ru/api/payment/result/mandarin. This allows Skillspace to receive payment notifications and grant course access to students after payment.

# 2. Skillspace setup
To configure the integration, open your Skillspace account, go to School Settings → Payment Options, and click Add another payment method.
In the form, select Mandarin from the list. Enter the API key and link ID saved in step 1, set VAT if needed, and click Save.

Done — the integration is configured! You can now add Mandarin as a payment method for any course.
# 3. Important notes
- The integration is tied to the payment link where you configured the API key. Any changes to that link affect the integration. This lets you manage the integration from the Mandarin dashboard without developer involvement — add payment methods, change available terms, set an offer link — and all changes apply to the integration immediately.
- Multiple services can be active on the integration at the same time: card payments, SBP, international payments, installments/credits, and split payments.

# Tilda
# Setting up a universal payment module
The article describes the process of setting up accepting payments through the Mandarin payment system for any website created using the Tilda Publishing website builder.
# Sequencing
In the admin panel of your website on Tilda, go to settings:

In the left menu, select the "Payment systems" section:
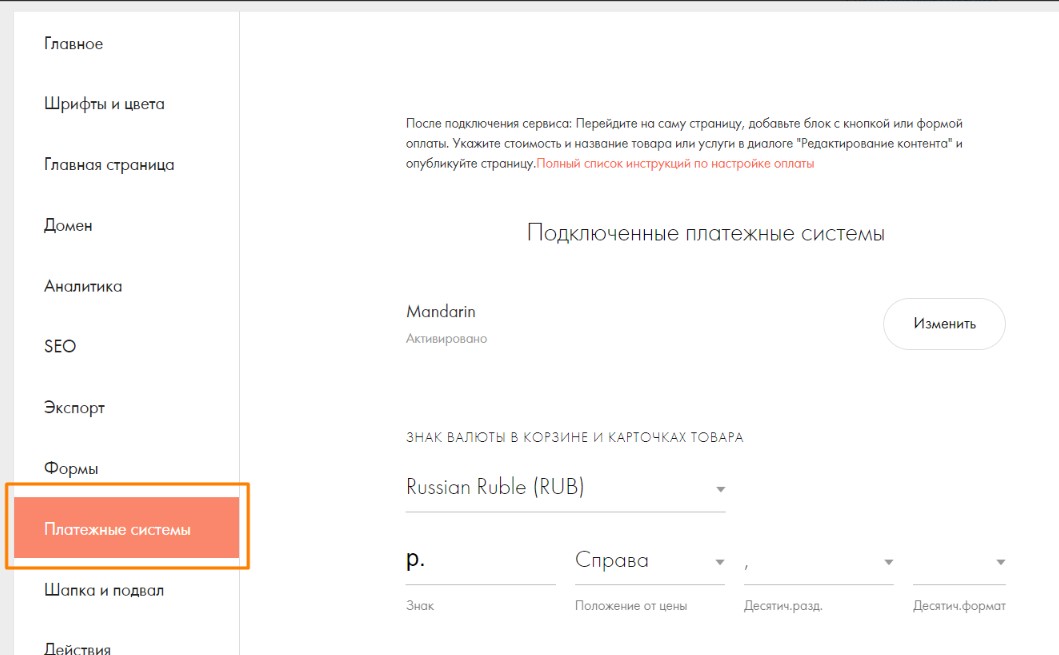
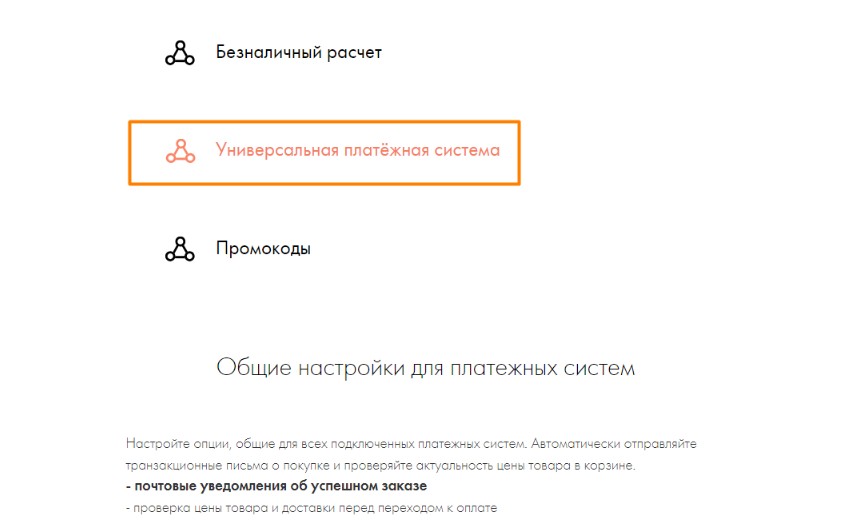
In the list of payment services, select "Universal payment system".

In the list of universal payment system templates, find Mandarin.
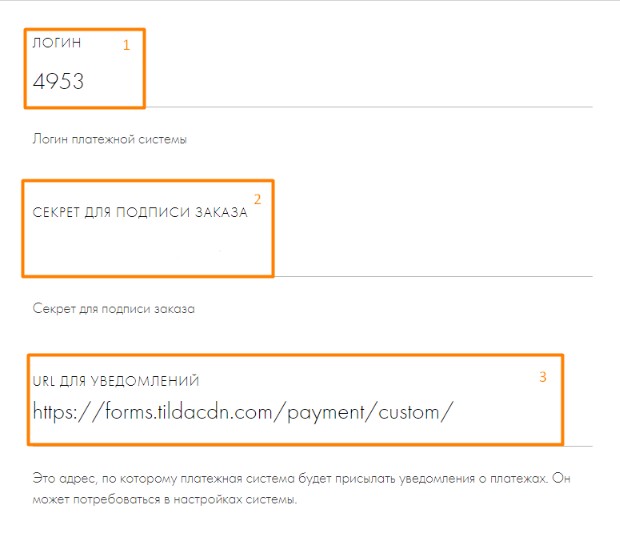
Enter:
- Login - enter MerchantID in the field - numeric identifier (opens new window) a combat project for accepting payments in the Mandarin system.
- The secret for signing the order is secret key (opens new window) (Secret), required to authenticate requests.
- URL for notifications - the Callback url to which Mandarin will send you a callback with information about operations.
Fill in the remaining fields - currency, country, tax regime, payment widget language. If you need to generate checks, enter data for fiscalization (fields "ELECTRONIC CHECKS (RF)" and FDF).
In the SUCCESS PAGE URL field, enter the URL of the page to which the user will be redirected in case of successful payment.
In the REFUSE URL field, enter the URL of the page to which the user will be redirected if errors occur during the payment process. List of common error codes.
In the Title field, enter Mandarin.
Click "Save". On the "Payment systems" tab, Mandarin will appear in the list of connected ones:

On pages with products, enable payment using Product sales scenario (opens new window) without selecting additional parameters or selling products with [selecting parameters](https: //help-ru.tilda.cc/online-store/parameters).
When you add payment blocks on any page of your site, the Mandarin payment system will be available:

Important!
For the integration to work correctly, you need to add the Cart ST100 block in the order form settings; integration will not work with other blocks. You also need to configure how to fill out the email field.
# Diafan CMS
# Joomla
# CS-CART
# Magento
# PHP Shop
# Prestashop
# Simpla
# UMI.CMS
# Webasyst
# Wordpress
# Insales
You need to get the authorization data in the Mandarin system.
Next, in Insales you need to add a new payment method: "External payment method".
In the menu that appears, you must enter:
- The value of
MerchantIDas the store ID. - The value of
Secretas the password. - The value of
http://pay.mandarinbank.com/mandarin_proxy.phpas an external link.
The MerchantID and Secret parameters can be found in personal cabinet).
Then you have to go to personal account (opens new window) and write in the Callback url field the value of "URL to go to when the payment is successful" from Insales.
Detailed instructions are in the archive (opens new window).
# RadicalMart
RadicalMart is a solution for creating and operating an online store or selling landing page, taking into account different needs.
Payment plugin that integrates the Mandarin payment system into ecom projects managed by RadicalMart:
- to the [plugin] page(https://sovmart.ru/catalog/plugins/radicalmart-payment-mandarin);
- help with connection (opens new window).
Read more about the platform for creating online stores RadicalMart on the official website (opens new window).